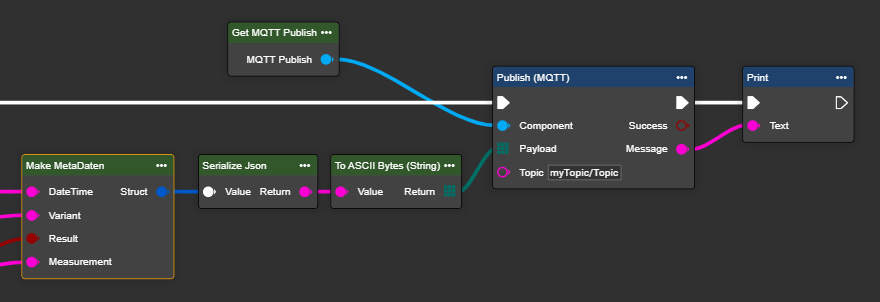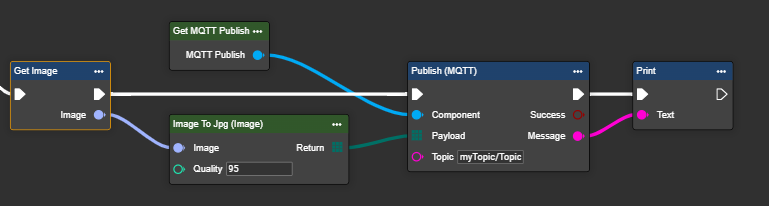
MQTT (Message Queuing Telemetry Transport) is a lightweight communication protocol that was developed specifically for data exchange between devices. It is based on the “publisher-subscriber” principle and is particularly suitable for applications in the Internet of Things (IoT) sector, as it works reliably even with low bandwidth. In this user manual, MQTT is used to control image capture, data forwarding, and camera monitoring. A distinction is made between whether the camera listens to a broker (“subscribe”) or sends data to a topic (“publish”).
Connection parameters
Before a subscription can be set up, certain access data is required.
The authentication of a client with a broker depends on the respective configuration of the broker. There are several ways to configure authentication:
-
No authentication
-
Username and password (credentials)
-
Client certificate (certificate)
-
A combination of username, password, and certificate (combination)
In addition, the client can also verify the server certificate. If it is a certificate from a trusted certification authority, the client can accept it automatically. These are usually stored in the system store.
However, it is also common to use self-signed certificates. In this case, the client must verify the certificate provided by the server itself and requires the corresponding root CA certificate (Certificate Authority) to do so.
The client must therefore have the following information in order to connect successfully and securely:
-
Client certificate (e.g. .crt, .pem, etc.)
-
Root CA certificate (e.g., .crt, .pem, etc.)
-
Key file (optional) (.key)
-
Key file password (optional, if key file is encrypted)
The following table shows the data you need to request from your IT department for each situation.
|
Parameter |
Authentification |
||||
|---|---|---|---|---|---|
|
|
None |
Credentials |
Certificate |
Expand Certificat |
Combination |
|
Address |
|
|
|
|
|
|
Port |
|
|
|
|
|
|
Timeout |
|
|
|
|
|
|
Topic |
|
|
|
|
|
|
Use Credentials |
|
|
|
|
|
|
Username |
|
|
|
|
|
|
Password |
|
|
|
|
|
|
Use Certificate |
|
|
|
|
|
|
CA-File |
|
|
|
|
|
|
CERT-File |
|
|
|
|
|
|
Key-File |
|
|
|
|
|
|
Use Encrypted |
|
|
|
|
|
|
Key-File Password |
|
|
|
|
|
|
Protocol Version |
|
|
|
|
|
|
Quality Of Service |
|
|
|
|
|
The required access data is described in detail below.
|
Parameter |
Type |
Unit |
Explanation |
Example |
|---|---|---|---|---|
|
Address |
Domain || IP |
|
The broker's destination address. This is usually provided by IT. |
mybroker.mydomain.de
|
|
Port |
Integer |
|
The broker's port address. This is usually specified by IT. Please note that certain ports must be approved by IT when integrating the camera. |
8883 |
|
Timeout |
Integer |
[ms] |
Timeout describes the maximum time that the application may take to connect to the broker before attempting to reconnect. |
5000 |
|
Topic |
String |
|
A topic in MQTT is a hierarchical path through which clients publish or receive messages based on their subscription. |
myTopic Pfad/Pfad1/Pfad2/myTopic |
|
Use Credentials Authentication |
Bool |
|
If a username and password are provided for authentication, this option can be selected. |
|
|
Username |
String |
|
A username in MQTT is used to authenticate clients with the broker, often in conjunction with a password for access control. |
Hans |
|
Password |
String |
|
A password in MQTT is used together with the user name to securely authenticate the client to the broker and control access. This requires a secret from the evoVIU secret store. |
|
|
Use Certificate Authentication |
Bool |
|
Instead of user names and passwords, MQTT uses digital certificates to authenticate clients and brokers to each other via a TLS/SSL-encrypted connection. |
|
|
Ca File |
File |
*.pem |
The CA file in MQTT checks whether the client's or broker's certificate comes from a trusted certification authority. |
|
|
Cert File |
File |
*.pem
|
The cert file (certificate file) contains the public certificate of a client or broker and confirms its identity when connecting. |
|
|
Key File |
File |
*.key |
The key file contains the private key of the client or broker and is used to securely encrypt and sign TLS connections. |
|
|
Is Encrypted Key File |
Bool |
|
If the key file is encrypted, the key can also be activated with an additional key file password. |
|
|
Key File Password |
Secret |
*.key
|
The key file password protects the private key in the key file from unauthorized access—it can only be decrypted with the password. |
|
|
Protocol Version |
Dropdown |
V310
|
The protocol version indicates which MQTT standard is used to publish and receive data on the broker. The IT department can reliably assist with the selection of the protocol version. |
V311 |
|
Quality Of Service |
Dropdown |
|
The Quality of Service (QoS) level defines the delivery guarantee between the sender and the receiver of a message. There are three QoS levels in MQTT:
|
At most once |
Notes on the settings:
-
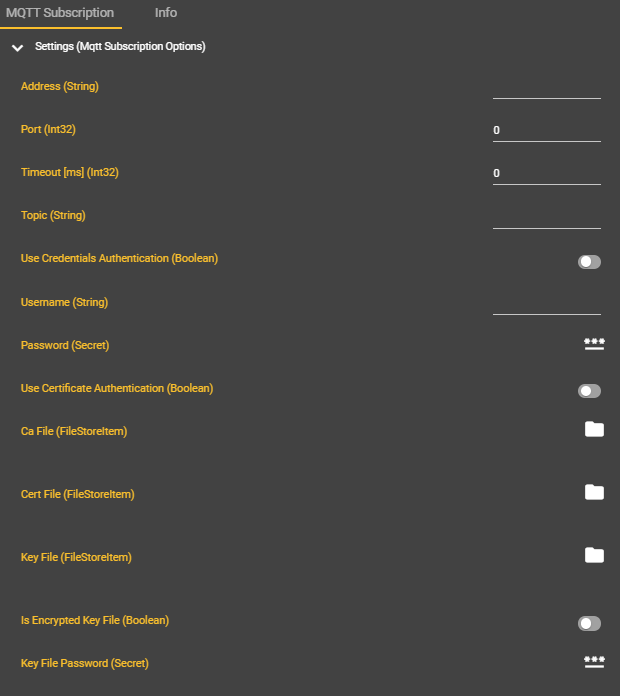
Depending on how the MQTT broker is configured, authentication can be performed either using credentials and/or a certificate.
-
The toggles Use Credentials Authentication and Use Certificate Authentication can be used for this purpose.
-
-
When authenticating via certificate, the corresponding files can be loaded from the file system via Ca File, Cert File, and Key File. To do this, they must first be stored in the file system.
-
If the key file is encrypted, the necessary key can be stored via the Toggle Is Encrypted Key File and the Input Key File Password.
-
Workflow Setup
Difference between MQTT publish and MQTT subscription
The publish node is used to send data from the camera to a broker, addressing a specific topic. A subscription, on the other hand, allows data to be received as soon as new information is published on the respective topic.
Any number of publish and subscription endpoints can be set up in the Visionweb platform. For example, image capture, including associated metadata, can be triggered via a subscription and then sent to a desired target endpoint. At the same time, it is possible to provide status or health data via another endpoint.
Creating the MQTT subscription – step by step
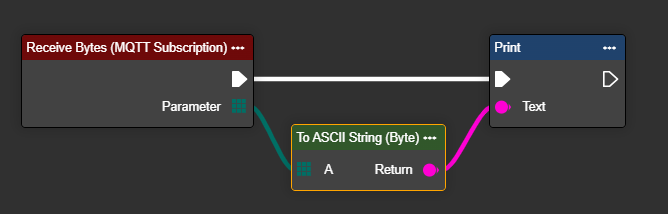
After creating the MQTT subscription component, the event node Receive Bytes can be added to the workflow. This is triggered by an incoming message from the MQTT broker on the corresponding topic and contains the data sent as a byte array in the socket parameter.
-
In Workflows, go to Components and select ➕ .

-
Look for “MQTT Subscription”.
-
A new component called “MQTT Subscription” appears.
-
Enter your login detailshttps://evopro.atlassian.net/wiki/spaces/DVIU/pages/678265439/8.5.0-en%2BMQTT#Zugangsdaten .
-
Go to your Event Graph and open the context menu by right-clicking.
-
Under Events, search for “MQTT Subscription” or the name you gave the component.
-
Select the “Receive Bytes (MQTT Subscription)” event.
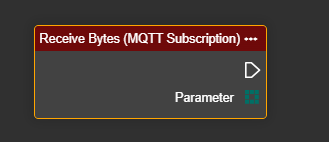
From this point on, the event is triggered whenever the data record changes at the broker. The best way to display this is via the print node in the output.
Output of the received data in the output
The following example shows a simple way to quickly check whether data from the broker can be received by the camera.
Creating the MQTT publish - step by step
After creating the MQTT subscription component, the event node Receive Bytes can be added to the workflow. This is triggered by an incoming message from the MQTT broker on the corresponding topic and contains the data sent as a byte array in the socket parameter.
-
In Workflows, go to Components and select ➕ .
-
Search for “MQTT Publish”.
-
A new component called “MQTT Publish” will appear.
-
Enter your https://evopro.atlassian.net/wiki/spaces/DVIU/pages/678265439/8.5.0-en%2BMQTT#Zugangsdaten
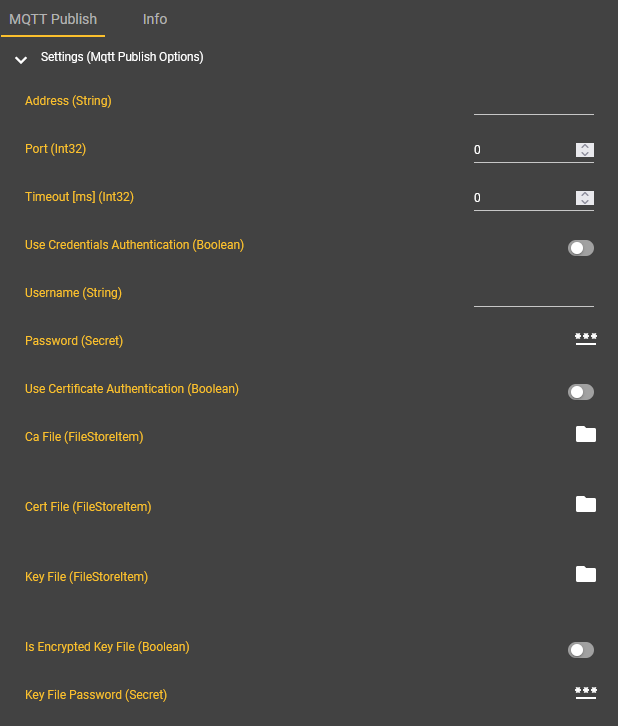
Unlike the subscription, the publish component does not initially have an input field for the topic. This is only required in the downstream workflow step in the publish node, as multiple topics can be assigned to an endpoint.
-
Go to your Event Graph and open the context menu by right-clicking.
-
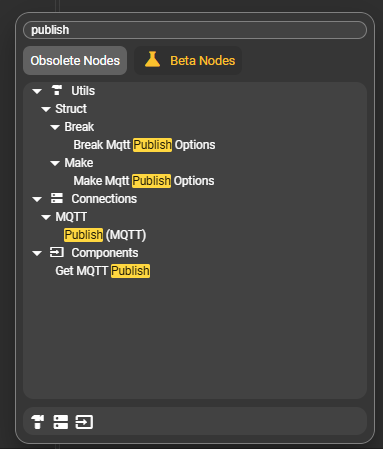
Under Events, search for “Publish” or the name you gave the component.
-
Select the “Publish” node and the corresponding reference component “Get MQTT Publish”.
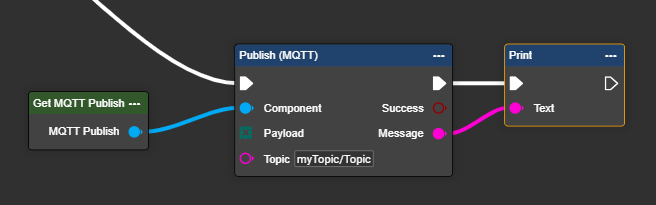
Place the Publish node at the point in the workflow where you want to forward your data to a desired endpoint. If you use several different broker endpoints, you can create several Publish components accordingly. Make sure to name the components in a meaningful and unique way to ensure clarity in the workflow.
Using the “Publish” node
The “Publish” node allows you to send data to any topic in a highly flexible and dynamic manner. To do this, either enter the desired topic directly in the node's parameter line or have it automatically generated and integrated in the workflow.
Please ensure that the topics are spelled correctly. If you are unsure, contact your IT department.
The following conventions generally apply:
-
Simple topics (direct designations) usually consist of a single term:
myTopic
-
Topic paths are often separated by slashes ( / ) or dots ( . ):
myTopic/mySubtopic/superTopic
myTopic.mySubtopic.superTopic
-
In some systems, a trailing separator is required to address multiple records or subtopics:
myTopic/mySubtopic/superTopic/
myTopic.mySubtopic.superTopic.
If data is not received or sent as expected, please check the spelling of the topic. Incorrect syntax may be the cause.
The payload can be converted from all kinds of data into a byte array and sent via MQTT. This makes it possible to send not only metadata and results, but also entire data sets including images, if desired.