NAS - SMB
A NAS system with SMB (Server Message Block) sharing offers a simple and reliable way to centrally store and manage files—including images, videos, and documents—within a network. By using user rights and sharing permissions, access can be specifically controlled and restricted to defined users or groups. Access is provided directly via the local network or, if configured accordingly, remotely without additional software. A NAS with SMB is particularly suitable for applications where fast file storage, sharing, and easy integration into existing IT infrastructures are paramount. Thanks to standardized protocols, the system can be easily integrated into different operating systems and workflows. This guide shows you step by step how to set up an SMB share, access it, and store files securely.
Currently, especially with older NAS systems, there may be isolated cases where files are not reliably stored by the camera. We are working hard to find a solution. Systems from well-known manufacturers such as Synology are generally not affected by this issue. We apologize for any inconvenience.
Connection parameters
Parameter | Type | Explanation | Example | Upload | SMB Camera |
|---|---|---|---|---|---|
Version | Dropdown String | Specifies the SMB protocol version used to connect to the NAS server (e.g., SMB 2.1 or SMB 3.0). Compatibility depends on the server and client systems. | V3 |
|
|
Server Address | String | Specifies the network address (host name or IP address) of the NAS server through which the SMB share is accessible. It forms the basis for establishing a connection to the storage destination. | myserver.myfactory.com |
|
|
Transport Type | Dropdown String | Determines the transport protocol used for the SMB connection, e.g., TCP or NetBIOS. It affects how data is transferred to the NAS over the network. | NetBIOS |
|
|
Domain Name | String | Specifies the name of the Windows domain in which the NAS server is located. It is required for authentication when users access via domain accounts. | myfactory-ag |
|
|
Username | String | Defines the user name for authentication on the NAS server. It must have sufficient permissions to access the configured SMB share. | My.Name |
|
|
Password | String - Secret | Used together with the user name for authentication. It enables secure access to the SMB share and should be treated as confidential and stored securely. | <myPassword> |
|
|
Authentication Method | Dropdown String | Specifies which method is used for user authentication – e.g., simple login (NTLM) or Kerberos. The choice affects the security and compatibility of the connection. | NTLMv2 |
|
|
Share | String | Refers to the name of the shared resource (shared folder) on the NAS server. It defines the entry point for accessing the desired files via SMB. | MyDrive |
|
|
Directory | String | Specifies the path within the SMB share where files are stored or read. The folder must exist or be created accordingly. | Subfolder |
|
|
Payload | Byte Array | Contains the actual data to be transferred in binary form, e.g., images, videos, or documents. These are transferred via SMB to the destination directory on the NAS. | Image from “Image to JPG” Knoten |
| |
Access | Share Access | Defines the type of access to the SMB share, e.g., read, write, or full access. Controls how the user is allowed to interact with the shared resource. | Selection via node “Make Share Access” |
| |
Create Disposition | Dropdown String | Determines how to proceed when accessing a file – e.g., whether to create, overwrite, open, or only create a new file if it does not exist. | FileCreate |
| |
Is Lazy | Boolean | Controls the loading process for files. When this option is enabled, files are transferred sequentially (lazy) instead of simultaneously in order to use system resources more efficiently. | True |
| |
Cycle Image | Boolean | Specifies whether the same image is always loaded when accessed repeatedly, or whether different images from the directory should be used in succession. | True |
| |
Image Type | Dropdown String | Specifies the color mode in which images are converted, downloaded, and processed—as color images or grayscale images, depending on the application. | Color |
|
General information about NAS settings
Please consult with your IT department regarding the current settings of the NAS. All information is relevant and important for proper operation. Modern NAS servers typically run with the settings marked in green.
Version
Version | SMB-Version | Status | NTLM-Dependency | Recommendation |
|---|---|---|---|---|
V1 | SMB1 | Obsolete❌ | Uses NTLM | Do not use! |
V2 | SMB2 | Obsolete⚠️ | Can use NTLM | Use only when necessary |
V3 | SMB3 | Current ✅ | supports Kerberos | Recommended (Windows 8 or later) |
Server-Adress
You can enter an IP address or domain here.
TransportType
Setting | Value | Cause |
|---|---|---|
TransportDirectTCP | ✅ Activated | Modern SMB transmission via port 445 |
activate NetBIOS | ❌ deactivate | No longer necessary, unsafe |
Domain-Name, Share & Directory
This is required if it is not possible to log in with a standard Windows user, but a local NAS user is required. Usually the domain.
\\myFactory\MyDrive\MySubfolder\MyOtherSubfolder
Domain: myFactory
Drives and subfolders can be set in the Upload SMB node.
Share: MyDrive
Directory: MySubfolder\MyOtherSubfolder
Authentication method
Setting | Recommendation |
|---|---|
NTLMv1 | ❌ Deactivate |
NTLMv1Extended | ✅ Can work |
NTLMv2 | ✅ Activate |
Workflow Setup
Creating an SMB client connection for uploading
In Workflows, go to Components and select ➕.
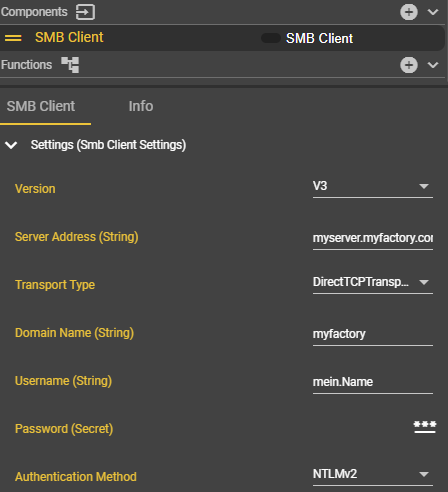
Search for the “SMB Client” component in the menu and select this entry.

A new component called “SMB Client” appears. You can rename this component at any time by double-clicking on the component name.
Enter the connection details here.
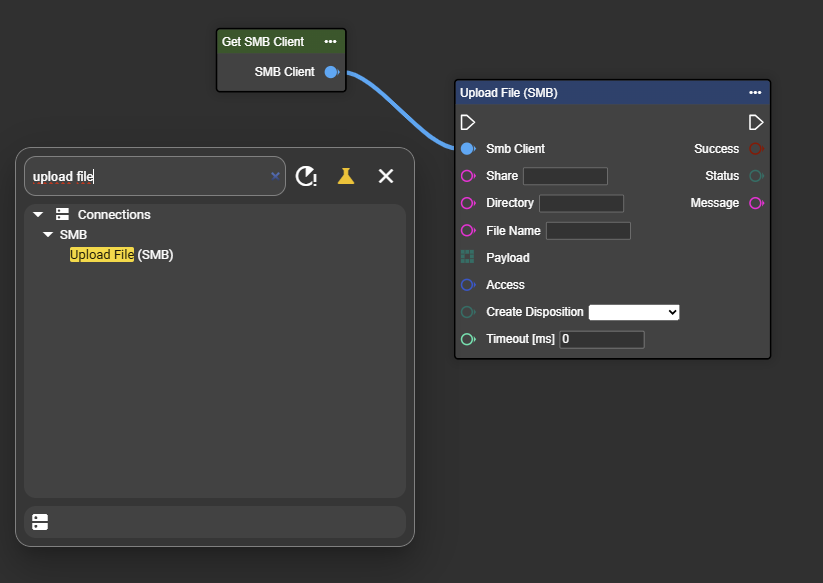
Open the context menu in the Event Graph by right-clicking, search for “Get SMB Client” and select this entry.
Congratulations—you have successfully created the component for your NAS SMB!
In the context menu of the workflow, search for “Upload (SMB Client)” and select this entry to add the node to the workflow.
Enter the appropriate connection parameters here as well. To configure access permissions, search for “Make Share Access” in the context menu and select the entry. The node is added to the event graph. Set the appropriate permissions there.
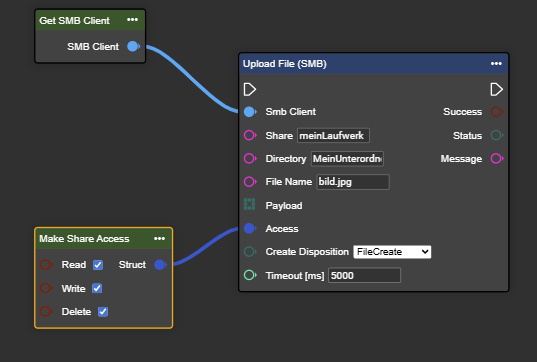
Connect the node to the rest of your flow and generate dynamic folder and file names if needed.

Congratulations! You can now successfully upload data to your drive.
If you want to see whether your transfers were successful, you can obtain the relevant information via the outputs “Success,” “Status,” and “Message.”

Creating an SMB camera
In Workflows, go to Components and select ➕.
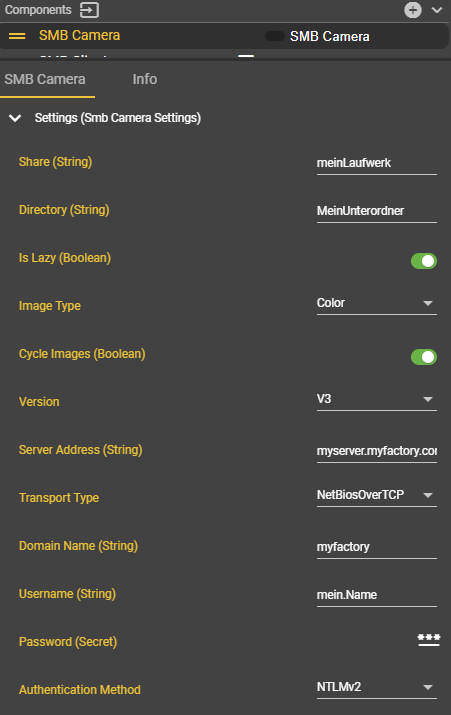
Search for the component “SMB Camera” and select this entry.

A new component called “SMB Camera” appears. You can rename this component at any time by double-clicking on the component name.
Enter the connection details here.
Open the context menu in the Event Graph by right-clicking, search for “Get SMB Camera” and select this entry.
Congratulations—you have now selected an “SMB Camera” that downloads images from your NAS and processes them in the workflow.
Search for “Grab Image” in the context menu and connect the “Get SMB Camera” node to the “Grab Image” node.
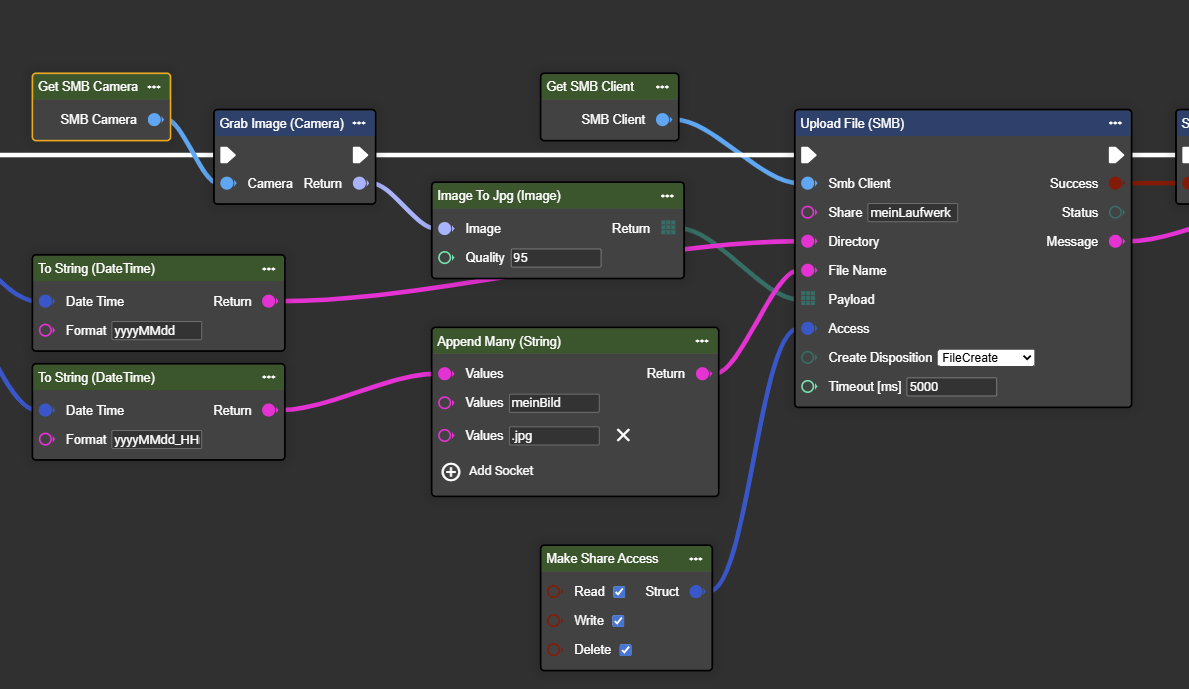
In the example, images are retrieved from the NAS and written to a new folder on the NAS with 95% JPG compression. This is only intended as an example of how to use the nodes. In the workflow, you can use any nodes that are suitable for your application.