Camera Components
Introduction
Hardly any application can do without images. This is one of the reasons why camera components are so important. In our workflow, you not only have access to the hardware of the evoVIU camera, but also to internal and external simulation cameras based on sample images.
Example
The following components can all be tested using a simple example. All that's needed is to configure a workflow in the Event Graph tab. This requires a start node, the Grab Image (Camera) node, the user-created component (named "My Camera" in this example), and a variable of type Image with a published value (declared as "My Image" in this example). The workflow then looks like this:

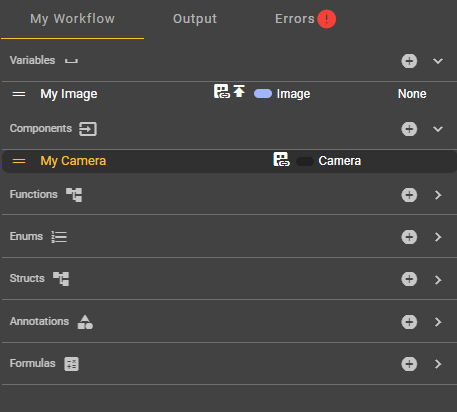
This example workflow will only function correctly if your component is fully configured with the correct data.
Azure Storage Blob Camera
With Azure Storage Blob Camera, you can load images directly from blob storage in the Azure cloud. You can obtain the necessary parameters either by creating a blob storage in Azure or by contacting your IT administrator.
Important: Direct access to the Azure cloud from the production network may not be possible from all locations. This usually requires special access rights, which your system administrator will gladly grant you – after some initial reluctance. Continuity is crucial for the success of your digitization project.
Parameter | Type | Description | Example |
|---|---|---|---|
Uri | String | Save the URL to the blob storage. You can access it in the cloud using an access token. It is essential that you have read permissions within the container. | |
Token | Secret | A password or token is required to access the blob storage. You should keep the token safe, as it grants you access to the blob storage. | <YourToken> |
Container | String | This is the folder where the images are stored. | pictures |
Cycle Images | Boolean | Users can decide here whether a new iteration should be performed from the beginning after a complete scan of the folder. | Possible values:
|
Is Lazy | Boolean | This method loads images only when they are actually needed, thus reducing the impact on performance. | Possible values:
|
Color | Enum | The images can be displayed in grayscale or color. | Possible values:
|
Camera
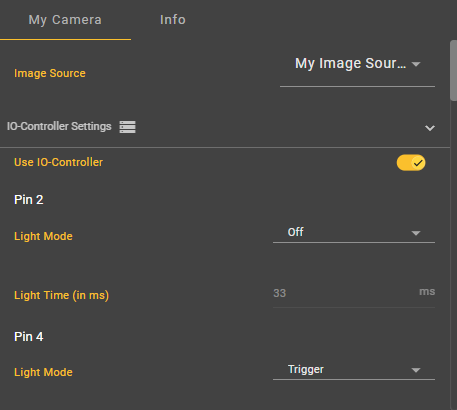
This component allows access to a previously created image source. You can select this image source in the camera settings. However, the camera node itself only uses the camera settings of the image source. Liquid lens and light settings must therefore be configured within the workflow itself. This offers the advantage of allowing you to dynamically control these settings via node inputs.
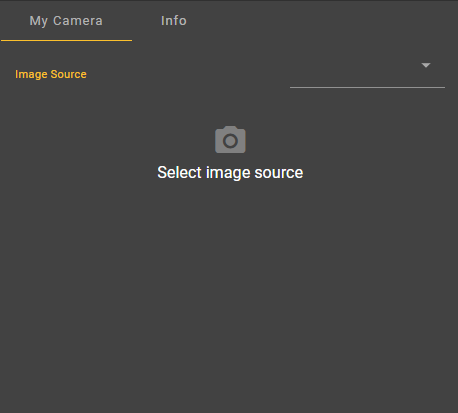
Select the Camera component. An empty dropdown menu will appear in the corresponding Details tab. There, you must select an image source configuration. If you do not yet have an image source configuration, you must first create one in the Image Source section and configure the settings for optimal image capture.
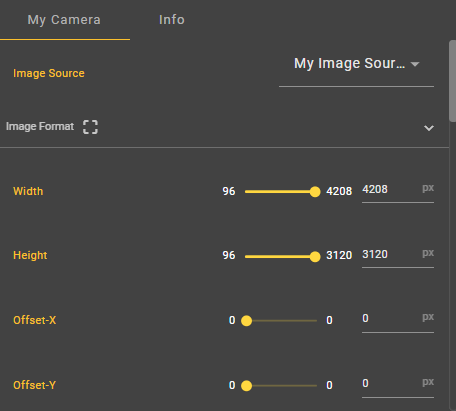
Once you have made a selection from the dropdown menu, the settings for the respective configuration will be displayed. You can edit these at any time, provided the selected workflow is not active.
File Camera
A file camera does not directly access the currently captured image sources. Instead, you can specify a path to previously saved images. To do this, select the storage location of the saved images under "Directory".
Parameter | Type | Description | Example |
|---|---|---|---|
Is Lazy | Boolean | This method loads images only when they are actually needed, thus reducing the impact on performance. | Possible values:
|
Directory | FileStoreDirectory | Select a directory from the file system that contains realistic sample images, or create a new folder. |  |
Include Subfolders | Boolean | Specify whether you also want to use subfolders, if any. | Possible values:
|
Cycle Images | Boolean | Users can decide here whether a new iteration should be performed from the beginning after a complete scan of the folder. | Possible values:
|
Color | Enum | The images can be displayed in grayscale or color. | Possible values:
|
Image Source
This component allows access to a previously created image source. You can select this image source in the camera settings. Unlike the camera component, which only allows the configuration of aspects such as image format, shooting, color settings, and automatic functions, this component offers complete control over the image source within the workflow.
Select the Image Source component. An empty dropdown menu will appear in the corresponding Details tab. There, you must select an image source configuration. If you do not yet have an image source configuration, you must first create one in the Image Source section and configure the settings for optimal image capture.
Once you have made a selection from the dropdown menu, the settings for the respective configuration will be displayed. You can edit these at any time, provided the selected workflow is not active.
Remote Camera
With Remote Camera, you can access another evoVIU camera on your network. Create an image source on the desired camera with the desired settings. To do this, select the "Remote" option for the image source under "Acquisition". The UUID displayed in the browser bar can be used as the image source ID.
Parameter | Type | Description | Example |
|---|---|---|---|
Image Source Id | String | Specify the UUID of the image source you wish to use for image capture. You can find this by opening the image source in your browser and copying the URL portion to https://IP-Adresse/image-source/. | 52db1383-7954-4868-8d66-421edb60d9de |
Ip Address | String | Enter the IP address of the evoVIU camera on your network from which you want to retrieve the images. | 10.30.4.222 |
Username | String | Enter your username, which will be used for authentication and to establish a connection. | DeinName |
Password | Secret | Enter the password to be used for authentication and/or establishing a connection. | <DeinToken> |
SMB Camera
An SMB camera does not capture images in real time. Instead, it retrieves previously stored images from a remote NAS server using the SMB (Server Message Block) protocol. This is useful when images are generated by external devices or evoVIUs and stored for later processing.
Parameter | Type | Description | Example |
|---|---|---|---|
Share | String | Specify the name of your network folder. | |
Directory | String | Specify the folder containing the files to be used. | |
Is Lazy | Boolean | This method loads images only when they are actually needed, thus reducing the impact on performance. | Possible values:
|
Image Type | Enum | The images can be displayed in grayscale or color. | Possible values:
|
Cycle Images | Boolean | Users can decide here whether a new iteration should be performed from the beginning after a complete scan of the folder. | Possible values:
|
Version | Enum | Select the SMB protocol version. V3 is recommended – the newer the protocol, the better the security and performance. | Possible values:
|
Server Address | String | The IP address or hostname of the NAS or SMB server you want to connect to. | 10.30.4.222 |
Transport Type | Enum | Choose a suitable type based on your network configuration and server compatibility. Using DirectTCP Transport is recommended. | Possible values:
|
Domain Name | String | The authentication domain assigned to the server. | |
Username | String | Enter your username, which will be used for authentication and to establish a connection. | YourName |
Password | Secret | Enter the password to be used for authentication and/or establishing a connection. | <YourToken> |
Authentication Method | Enum | Choose one encryption method. NTLMv2 is recommended. | Possible values:
|