Adobe AEM
Adobe Experience Manager (AEM) offers a centralized, powerful platform for managing and delivering digital content—especially large volumes of images, videos, and documents. Through the integrated Digital Asset Manager (DAM), media content can be efficiently organized, versioned, and targeted for delivery. Access to assets can be precisely controlled via user roles and workflows, enabling secure and controlled usage—even without direct access to the backend system. AEM is ideal for companies that want to centrally manage consistent content across various channels. Thanks to extensive integration capabilities, AEM can be flexibly embedded into existing system landscapes. This guide shows step-by-step how to upload, manage, and deliver media in AEM for different applications.
Since June 2025, the currently used transmission method of Adobe's AEM has become obsolete. We adjust the connectivity options for newer methods as needed.
Authentication
So far, a Bearer token is used for the AEM Upload node. This must be correctly generated before uploading an asset. For this purpose, a .json file is used, which has the following format:
{
  "ok": true,
  "integration": {
    "imsEndpoint": "<IMS_ENDPOINT>",
    "metascopes": "<METASCOPES>",
    "technicalAccount": {
      "clientId": "<CLIENT_ID>",
      "clientSecret": "<CLIENT_SECRET>"
    },
    "email": "<EMAIL>",
    "id": "<ID>",
    "org": "<ORG>",
    "privateKey": "-----BEGIN RSA PRIVATE KEY-----\r\n<KEY>\r\n-----END RSA PRIVATE KEY-----\r\n",
    "publicKey": "-----BEGIN CERTIFICATE-----\r\n<KEY>\r\n-----END CERTIFICATE-----\r\n",
    "certificateExpirationDate": "<EXPIRATION_DATE>"
  },
  "statusCode": 200
}Documentation Adobe:
https://experienceleague.adobe.com/en/docs/experience-manager-cloud-service/content/assets/admin/developer-reference-material-apis
Meta data
Documentation:
https://experienceleague.adobe.com/en/docs/experience-manager-cloud-service/content/assets/manage/metadata-schemas#edit-metadata-schema-forms
(possibly open in a private window due to login)
For the metadata, the underlying JCR (Java Content Repository) key-value pairs must be provided as metadata items to the upload node. The metadata can also have custom values - so it always depends on how the AEM system is set up and which metadata schema is used.
There are also standard fields such as:
dc:title for the title
“MyTitle”
dc:subject for a description or subject
“MySubject”
Connection Parameters
Parameter | Type | Unit | Declaration | Example |
|---|---|---|---|---|
Address | String | Defines the URL or the endpoint of the AEM server (e.g. | https://author-<AUTHOR-ID>.adobeaemcloud.com | |
Jwt Credentials File | JSON-File | The .json file, which contains the Service Credentials . It can be generated by an admin from the AEM system and must be provided in the workflow for generating a Bearer Token for authentication. | ||
Target Folder | String | Specifies the path where files are stored in AEM. The path can be provided without the prefix | MySubfolder | |
File Name | String | The name of the file as it should be displayed in AEM. Attention must be paid to the file extension here! Depending on which file extension (.txt, .jpg, .bmp, ...) is used, the file will be interpreted in the AEM system and displayed accordingly. Example: Uploading a | 20250731_myImage.jpg | |
Payload | Byte Array | Contains the digital content (e.g., images, PDFs, or videos) to be uploaded to the AEM DAM. The data is transmitted and processed as a byte array. | Image via “Image to JPG”-node | |
Metadata Items | Metdata Items | The metadata of an AEM Asset is generated separately. For this purpose, an array of key-value pairs can be created via the Generate Metadata Items (Adobe) Node which is used as input in the Upload Node. Individual, empty metadata items are not allowed and will cause an error during execution. However, it is not mandatory to define metadata items overall. |
CODE
| |
Publish | Boolean | Indicates whether an uploaded asset should be automatically published after the upload. When enabled, the asset is immediately made available for delivery in AEM. This means data is transferred from the author instance to the public instance. |
Workflow Setup
Creating an AEM Connection
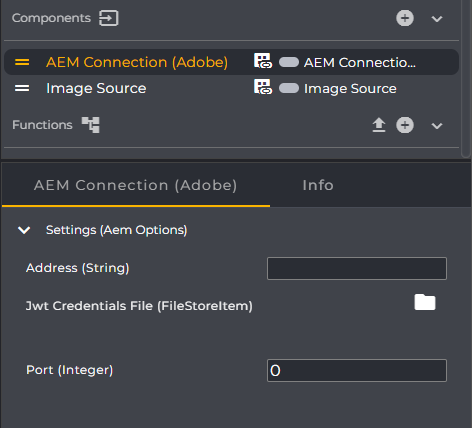
Go to Workflows under Components at ➕.
Search for the component “AEM Connection (Adobe)” and select this entry.
A new component named “AEM Connection (Adobe)” will appear. You can rename this component at any time by double-clicking on the component's name.
Enter the connection parameters here. Upload the corresponding JSON file for authentication in the File System and link it with the Jwt Credentials File. Also specify the appropriate port for establishing the connection.
Specifying the port is optional. For the AEM instance, for example, port 4502 can be chosen. If your address already has a port, you can override it using the port parameter.
Right-click in the Event Graph to open the context menu, search for "Get AEM Connection (Adobe)", and select this entry.
Congratulations - you have successfully created the component for AEM Connection (Adobe).
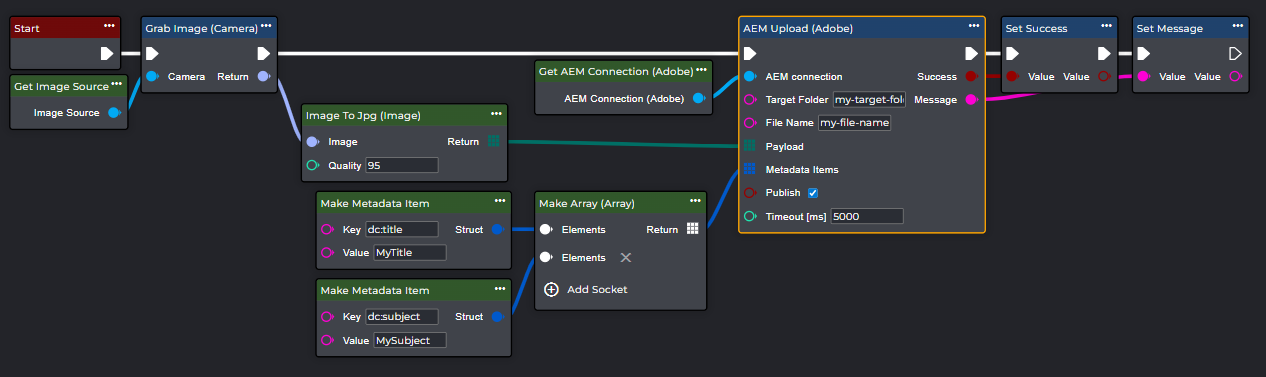
Also search for “AEM Upload (Adobe)” in the workflow's context menu and select this entry to add the node.
Enter the target folder and the file name.
If "Metadata Items" are required, these can also be transferred.