Industrial Dashcam
The dashcam version of the VIU2 supports end users in analyzing faults and tracking problems in the production environment. With its continuous recording, it makes it possible to view relevant events not only from the time of an error message, but also retrospectively before the error occurred. As a result, process deviations and faults in the process can be made visible and evaluated in a targeted manner.
This function helps to identify sources of errors at an early stage and rectify them sustainably. The dashcam function is integrated as standard in all VIU2 variants up to a resolution of 2 MPx. Alternatively, a more cost-effective version is available as a pure dashcam version - without integrated image processing algorithms.
The videos are initially transferred to MP4 format as file output. These can be easily transferred to the desired endpoints (Connections ) in Workflow or saved directly on the camera. An additional ring buffer allows the last 30 videos to be saved.
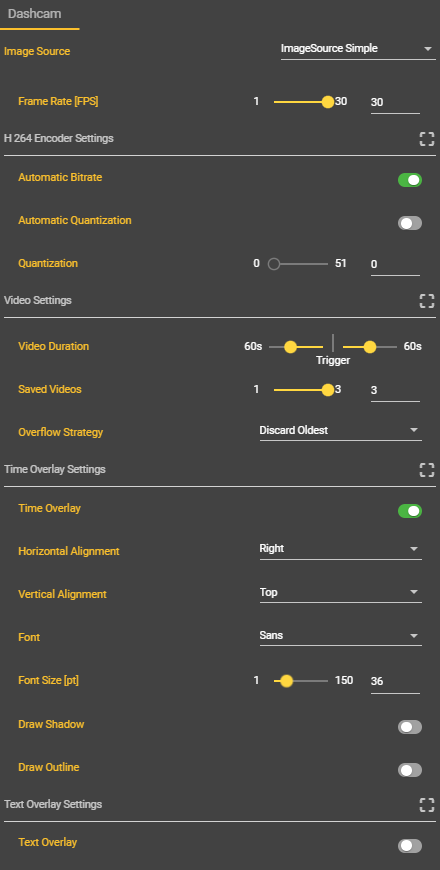
Settings
Parameter | Description | Recommendations |
|---|---|---|
Image Source | Specifies the image source used for the dashcam. | Use Image Source without gain and with a maximum resolution of 1920x1080. |
Frame Rate [FPS] | The sensor's frame rate can be set from 1 FPS to 30 FPS. | 30 FPS |
Encoder Settings |
|
|
Bitrate | Video bitrate in kb/s. A higher bitrate improves quality but increases file size. Select “Automatic Bitrate” for automatic mode. | Automatic Mode = True |
Quantization | A measure of compression, also called quantization parameter (QP). Higher values reduce file size but also quality. Select "Automatic Quantization" for automatic mode. | Automatic Mode = True |
Video Setting |
|
|
Video Duration before Trigger | Duration for which the dashcam records retrospectively. Selectable in 10-second increments. | as needed |
Video Duration after Trigger | Duration for which the dashcam will record after "Capture Dashcam Video" has been executed. Selectable in 10-second increments. | as needed |
Saved Videos | Maximum number of dashcam videos stored in the file system. | 30 |
Time Overlay Settings |
|
|
Time Overlay | Allows the display of the date and time in a desired region within the video. | as needed |
Horizontal Alignment | Specifies the horizontal position of the text in the video. | as needed |
Vertical Alignment | Specifies the vertical position of the text in the video. | as needed |
Font | Enables different fonts in the video. | Sans |
Font Size | Specifies the font size in the video. | 25 |
Draw Shadow | Enables shading in the video. | False |
Draw Outline | Enables the bordering of the text field in the video. | False |
Text Overlay Settings |
|
|
Text Overlay | Allows the display of custom text at a selected position in the video. | as needed |
Text | Specifies the individual text that will be displayed subsequently. Currently, the text cannot be dynamically inserted into the node because the dashcam always buffers for x seconds after startup. | as needed |
Horizontal Alignment | Specifies the horizontal position of the text in the video. | as needed |
Vertical Alignment | Specifies the vertical position of the text in the video. | as needed |
Font | Enables different fonts in the video. | Sans |
Font Size | Specifies the font size in the video. | 25 |
Draw Shadow | Enables shading in the video. | False |
Draw Outline | Enables the bordering of the text field in the video. | False |
Workflow Setup
In Workflows under Components, go to ➕ .

Search for “Dashcam”.
A new component with the name “Dashcam” appears.
Enter the desired settings for the video recording.
Congratulations! The dashcam has been successfully configured and is now recording a video with 30 seconds of footage from the past and 30 seconds from the trigger point.
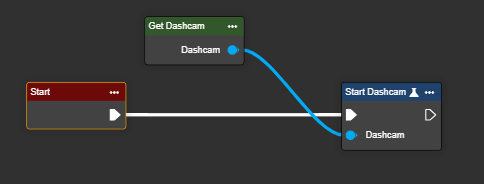
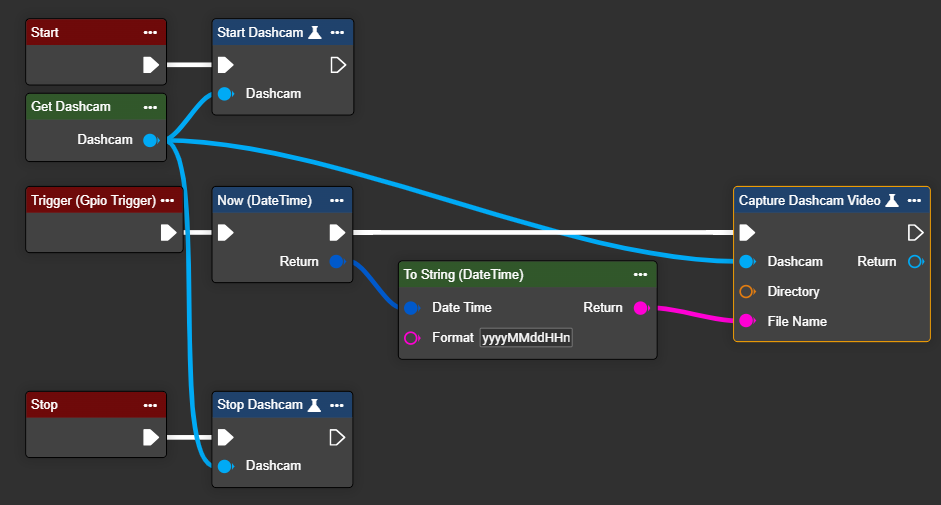
To record a video during the startup process, right-click in the Event Graph tab to open the context menu. Locate the entries “Start”, “Start Dashcam”, and “Get Dashcam”. Add these entries to your workflow. Now connect the “Start” node to the “Start Dashcam” node, and then connect the “Start Dashcam” node to the “Get Dashcam” node.
Video recording now starts automatically at the beginning of the workflow and runs for the set duration, e.g., 30 seconds. After this time, the video buffer is continuously overwritten every second, so that approximately 30–35 seconds of video footage are always available in RAM (in this case). When a trigger is activated, this buffer is combined with the subsequent recording and saved together—including additional recording for future use.
Now a trigger needs to be defined. To do this, create a "GPIO event" and use this event to then trigger the "Capture Dashcam Video" node. In this node, you can specify the desired destination folder in the file system where the recorded video should be saved.
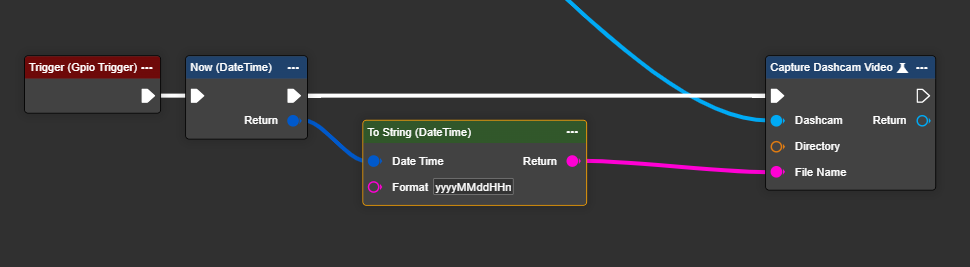
When triggered, a video is created with the current timestamp as the filename. Depending on the configuration, this video is saved in the specified destination folder. If the maximum number of videos stored in this folder is exceeded, the oldest video is automatically deleted.
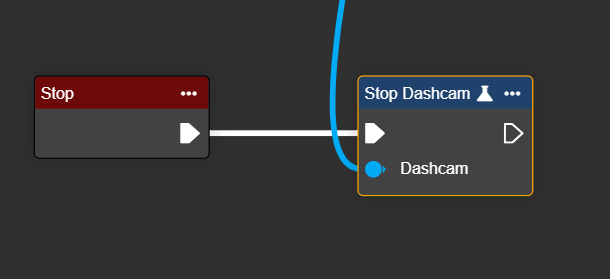
When the workflow is stopped, the background video recording must also be stopped. This is done with a “Stop” event and the “Stop Dashcam” node.
Below you have implemented a basic version of the dashcam in the workflow.
Congratulations! A video will now be automatically saved for each trigger, including both a defined lead time and a follow-up time. You can view the recorded videos in the corresponding target folder in the file system.
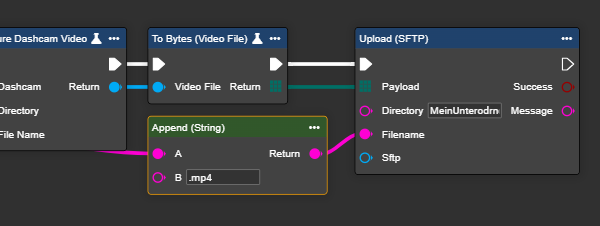
If you want to transfer the videos to a different destination, you can use one of the available cloud or local data storage nodes. For example, you can connect an "Upload (SFTP)" node to the end of the "Capture Dashcam Video" node. To transfer the video correctly, first convert it using the "To Bytes (Video File)" node and insert the resulting byte array as the payload. More information can be found here on https://evopro.atlassian.net/wiki/spaces/DVIU/pages/80019492.