Light control
Lighting control is a key component for reliable image acquisition. Using evoVIU in combination with VISIONWEB, different lighting sources can be controlled depending on the configuration. Both internal modules, such as the integrated Loxi lighting systems, and external lighting units connected via digital I/O are available. This flexible control allows lighting intensity, flash behavior, and switching cycles to be optimally adapted to the respective application. This ensures the appropriate illumination regardless of the environment and object surface – the basis for precise and reproducible image processing.
External lighting
Different lighting variants can be controlled via PIN 2 and PIN 4 using the 5-pin M12-A coded connector. The respective outputs can be specifically activated and configured in VISIONWEB. The following section explains this in more detail using a Balluff lighting module as an example.
Example: Baluff ring light https://www.balluff.com/de-de/products/BAE00AN?pf=F05603
Assignment: Pin 1: 24VDC, 2: Boost, 3: GND, 4: Trigger
If the light's trigger is set to high, the light is activated; if set to low, it is turned off. The boost function generates a light pulse that is up to 1.7 times stronger. In the VISIONWEB workflow, the corresponding control is structured as follows:

The output trigger controls the lighting's on and off. When the output is activated, the light turns on; after image acquisition, it is automatically deactivated again. For this purpose, the Digital Write components for PIN 4 (trigger) and PIN 2 (boost), as well as a camera, were created. For details, see Digital Input / Output If the boost is to be used, it can be set either before or after image acquisition.
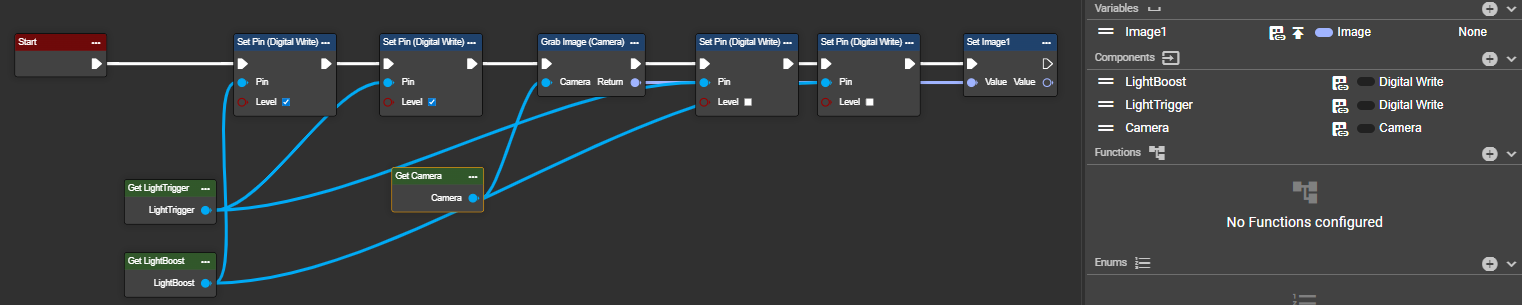
As with all examples, the following applies here too: You can flexibly adapt the boost, or the pin control in general, to your requirements. For example, it can be individually controlled via a communication interface by setting an appropriate Boolean value depending on the situation. There are virtually no limits to your wishes and application scenarios.
Congratulations – you can now control your external light source directly from the workflow.
Pulsed Lighting / Strobe
Pulsed light control is not yet available in the current version. This feature is expected to be implemented with the update in early January. However, please feel free to contact us if you need it—beta versions are usually released early.
Internal lighting
With the Loxi light modules 1, 2, and 3, evoVIU offers the possibility of operating internal lighting for both organic and metallic objects. These light sources can generally be configured and controlled directly via the image source. (https://evopro.atlassian.net/wiki/spaces/DVIU/pages/123800167)
Sometimes it's necessary to control the lighting directly via VISIONWEB, for example, if you want to specify a different lighting pattern for each variant. This can be done as follows:
Under Components, you can create a light component called "Loxi Light." In our example, we'll create two light sources, each with a different configuration.

Each lighting component can be individually configured. The desired current values are specified in the respective segments and activated as needed.
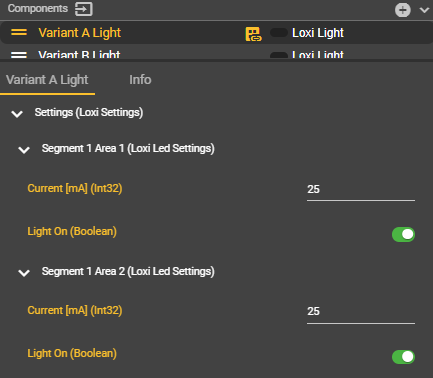
The current values are controlled in 25 mA increments due to the driver and can be set up to a maximum of 100 mA per light module. Please note, however, that the total current consumption must not exceed 800 mA.
Staring directly into the light for too long—especially with the Loxi 1—can cause glare. Therefore, always ensure the light source is correctly aligned and that uninvolved employees are not accidentally blinded.
The following current values can be set per segment: 0, 25, 50, 75, 100, 125, or 150 mA. Different recommendations apply depending on the Loxi module:
Loxi 1: 0, 25, 50, 75 mA – distributed across one LED per segment
Loxi 2: 0, 25, 50, 75, 100 mA – distributed across three LEDs per segment
Loxi 3: 0, 25, 50, 75, 100, 125, 150 mA – distributed across five LEDs per segment
Segment distribution | |
|---|---|
Loxi 1 | Loxi 2 & Loxi 3 |
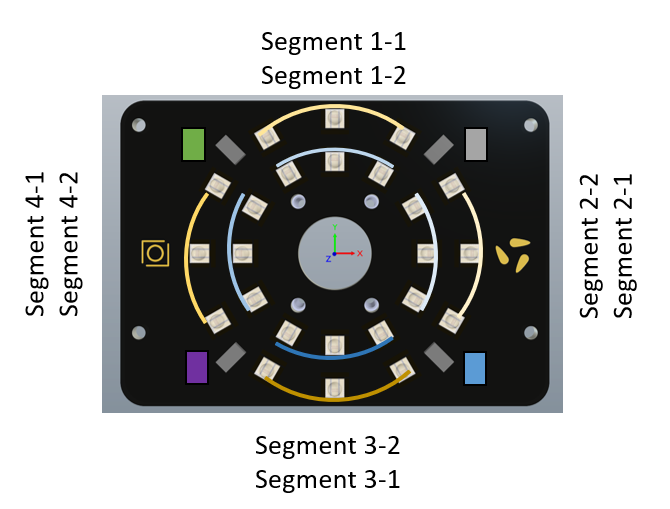 Loxi 1 controls one LED per segment, which is arranged in a ring around the lens. | 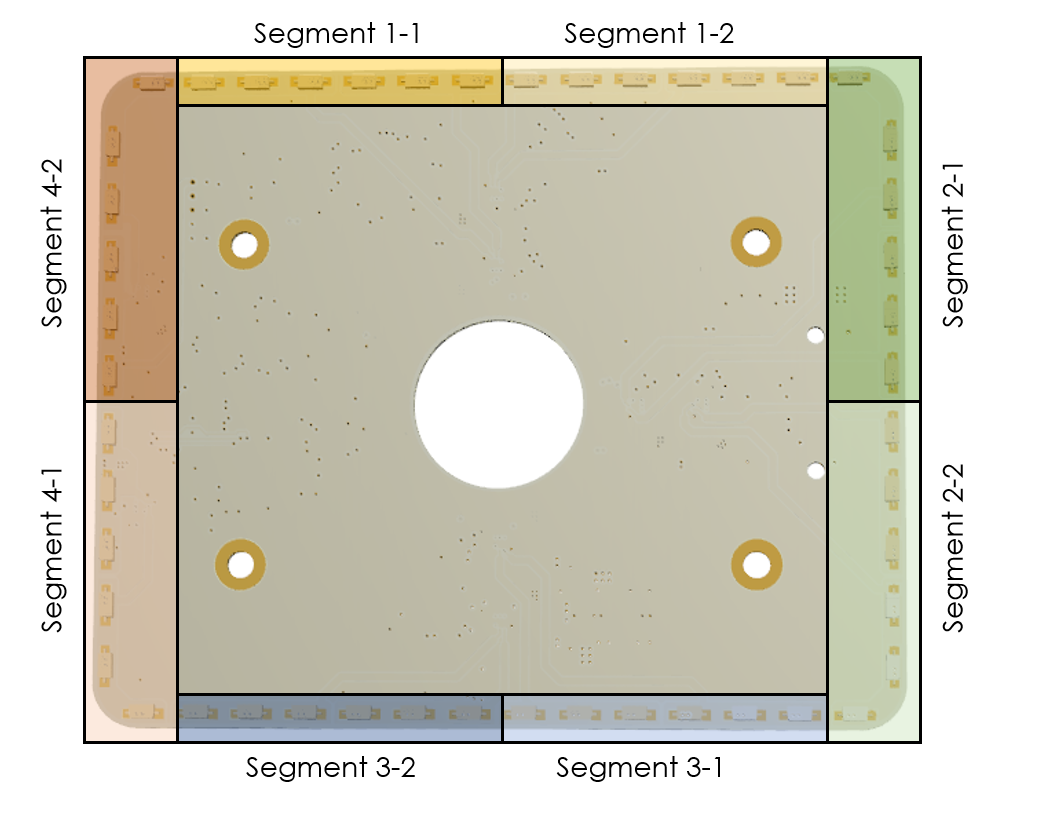 Loxi 3 has two more LEDs per segment than Loxi 2, but the segment layout remains identical. |
The light module can then be turned on or off using the "Turn On Lights" and "Turn Off Lights" nodes. To do this, search for "Turn On Lights" in the context menu and insert the node into the event graph.
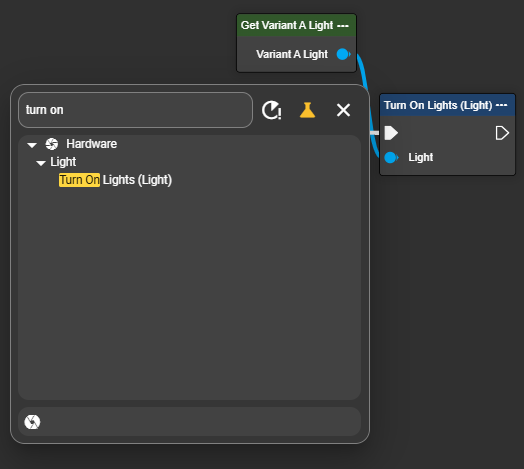
Image capture occurs between the "Turn On Light" and "Turn Off Light" nodes. Use the Grab Image node with the desired camera configuration.
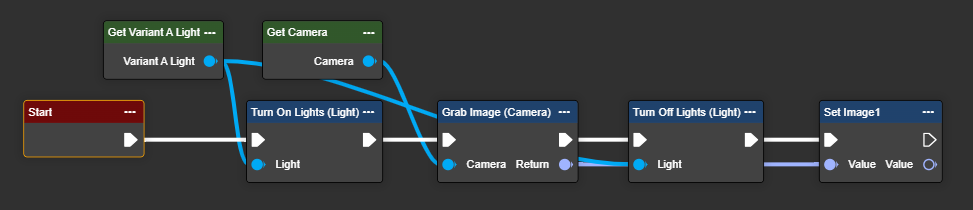
Congratulations – you can now control your internal light source directly from the workflow.
Variant-dependent lighting control
Depending on the situation, one of the two created lighting modules can be used. A Select node can be used to define which instance is activated. The workflow decides which lighting module is used based on the input parameters.

The example shows a TCP connection. Upon receiving a JSON telegram with the "UseLightA" parameter, the light pattern to be used is determined for each image. This allows for a high degree of flexibility in the workflow.
The control becomes even more flexible through the use of enums. In practice, however, the ShapeFromShading function is generally not controlled externally. The following example merely illustrates that four segments can be addressed sequentially – for example, to specifically test different variants.
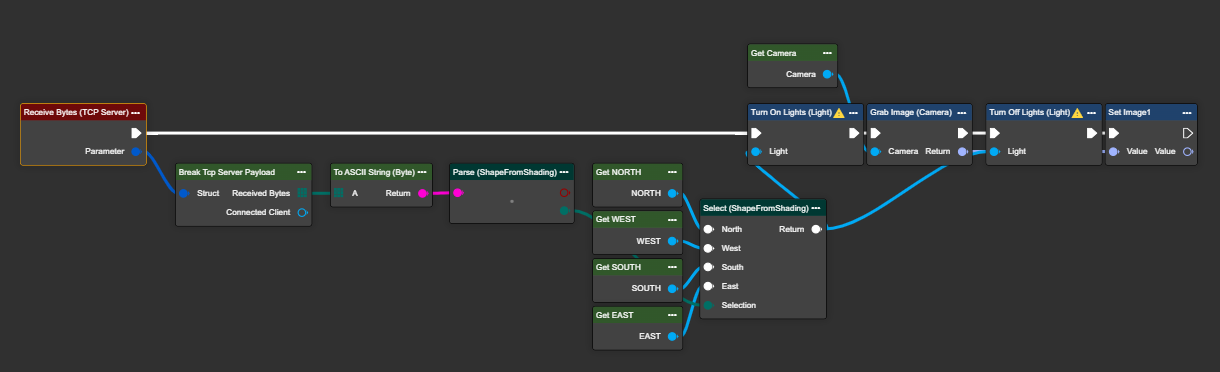
Congratulations – you can now control your internal light source variant-dependently.
Dynamic control of light
The lighting settings can now be dynamically adjusted at runtime. The nodes "Turn On Lights With Intensity" and "Turn On Loxi" can be used together with the component "Loxi Light" for this purpose.
Turn On Lights With Intensity
This node allows you to configure the light settings very quickly, as the attributes relate to the light in general.
Parameter set
Attribute | Type | Description |
|---|---|---|
Light | I Light, I Loxi Light | The corresponding component in the workflow for mapping the installed light. |
Intensity | Int32 | Sets the intensity of the light for the entire light range to the corresponding percentage value between 0 and 100. |
Turn On Loxi
This node allows you to individually configure the Loxi. The Loxi is divided into different segments based on the arrangement of the LEDs. The Turn On Loxi node enables users to fill the individual sections with different values to achieve optimal illumination for the next processing steps.
Parameter set
Attribute | Type | Description |
|---|---|---|
Loxi | I Loxi Light | The corresponding component in the workflow for mapping the installed Loxi. |
Intensity (Segment 1.1) | Int32 | Set the light intensity for the selected area of the Loxi to a percentage value between 0 and 100. |
Intensity (Segment 1.2) | Int32 | Set the light intensity for the selected area of the Loxi to a percentage value between 0 and 100. |
Intensity (Segment 2.1) | Int32 | Set the light intensity for the selected area of the Loxi to a percentage value between 0 and 100. |
Intensity (Segment 2.2) | Int32 | Set the light intensity for the selected area of the Loxi to a percentage value between 0 and 100. |
Intensity (Segment 3.1) | Int32 | Set the light intensity for the selected area of the Loxi to a percentage value between 0 and 100. |
Intensity (Segment 3.2) | Int32 | Set the light intensity for the selected area of the Loxi to a percentage value between 0 and 100. |
Intensity (Segment 4.1) | Int32 | Set the light intensity for the selected area of the Loxi to a percentage value between 0 and 100. |
Intensity (Segment 4.2) | Int32 | Set the light intensity for the selected area of the Loxi to a percentage value between 0 and 100. |