Formulas
This chapter provides general information on how to operate the formulas within the workflow of the evoVIU camera.
Introduction
The formulas are located in the My Workflow tab below the Regions & Annotations section. They are used to represent complex calculations in a reusable way with fewer nodes.
Managing Formulas
Creating a Formula
In the “Formulas” section, a new formula can be created using the plus icon. In principle, it is possible to create any number of formulas. Each formula is distinguished by its assigned label. This label can be freely chosen but must be unique within the formulas.
Deleting a Formula
As soon as you hover over a formula entry with the mouse, a trash can icon will appear to delete the formula. You can also use the keyboard shortcut ALT + Shift + Delete, provided a formula is selected. A dialog will then open, asking you to confirm the deletion process.
However, deleting a formula is only possible if it is not being used in the event graph of the workflow. If it is in use, you must first remove the formula from the event graph.
Moving a Formula
To give you a better overview of your formulas, you can sort the entries as you wish. To do this, make sure that the workflow is not active and that the editor is currently set to active. Once this is ensured, you can use the button with the two horizontal lines in front of the formula’s label to drag and drop it within the corresponding section. Once released, the formula will be placed at the new position.
Duplicating a Formula
When you hover over an entry with your mouse, an additional icon appears to the left of the trash can icon on the right side. Clicking this icon allows you to duplicate the formula along with all its components.
Formula Usages
As soon as you add a formula as a node in the event graph, a usage is created. This is indicated by an icon next to the formula’s label. Clicking this icon opens a dialog that lists the formula’s usages along with some details.
Configuring a Formula
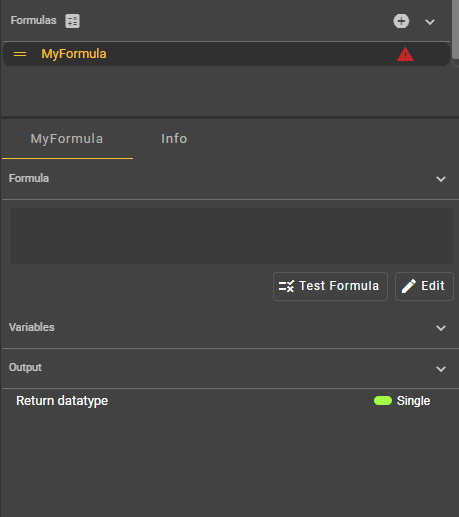
Selecting a Formula
Click on an entry in the Formulas section. Then select the corresponding Details tab, which is named after the selected formula. You will now see all available information about the formula and can edit it. If you have just created a formula, only the output — the result of the calculation — will be available for configuration in the Details view. There, you can view and modify the type.
Editing the Formula

Initially, the content of a formula is empty. As long as this is the case, you cannot add the formula to the event graph of the workflow. To proceed, click the “Edit” button to open the configuration dialog for the formula.
You will now see two sections: On the left, under “Current value,” the currently saved formula is displayed. This section is read-only. Editing takes place on the right side under “New value.” Here you can enter a formula of up to 100 characters. We’ll start simply with the example “a+b”.
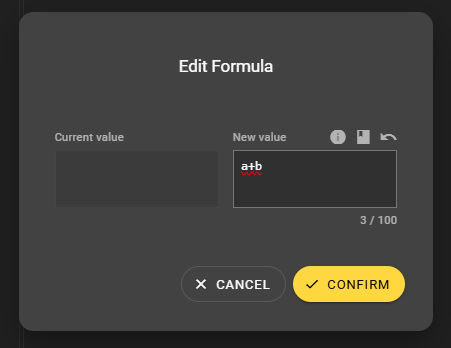
Enter “a+b” in the white box under “New value” in the “Edit Formula” dialog. Confirm your input by clicking the yellow “Confirm” button. The dialog will then close.
You may have noticed that parts of the dialog changed while entering the formula. For example, if you enter only “a+”, an error message will appear explaining why the formula is invalid in its current form. In this case, you will not be able to close the dialog or apply the changes.
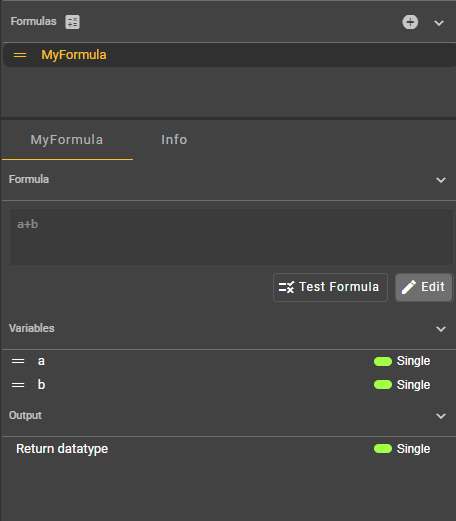
In the Details tab, you can now see the formula. You can change it at any time by simply clicking the “Edit” button again.
Reference to Documentation
In the “Edit Formula” dialog, to the right of the “New value” label, you’ll find a button represented by an info icon. Clicking this button will take you to the website of the underlying formula editor.
Cheat Sheet
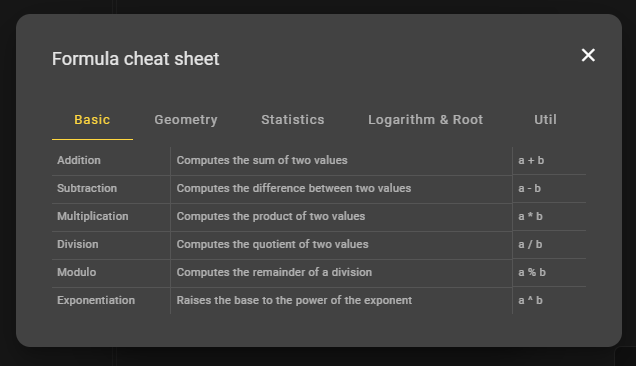
Next to the info icon, there is a button that opens the cheat sheet. This section provides suggestions and helpful tips for configuring formulas. The formulas are divided into the following areas:
Basic
Geometry
Statistics
Logarithm & Root
Util
The formulas from the cheat sheet in detail:
Tab | Action | Description | Formel |
|---|---|---|---|
Basic | Addition | Calculates the sum of two values |
|
Subtraction | Calculates the difference between two values |
| |
Multiplication | Calculates the product of two values |
| |
Division | Calculates the quotient of two values |
| |
Modulo | Calculates the remainder of a division |
| |
Potenzierung | Increases the base with the exponent |
| |
Geometry | Sinus | Sine of an angle |
|
Cosinus | Cosinus of an angle |
| |
Tangens | Tangens of an angle |
| |
Kotangens | Kotangens of an angle |
| |
Arkussinus | Inverser Sinus of an angle |
| |
Arkuscosinus | Inverser Cosinus of an angle |
| |
Arkustangens | Inverser Tangens of an angle |
| |
Arkuskotangens | Inverser Kotangens of an angle |
| |
Statistics | Minimum | Returns the smallest value in the set |
|
Maximum | Returns the largest value in the set |
| |
Durchschnitt | Calculates the mean of the values |
| |
Median | Returns the middle value when sorted |
| |
Logarithm & Root | Natural logarithm | Logarithm to base e |
|
General logarithm | Logarithm to base 10 |
| |
Logarithm base n | Logarithm of x with base n |
| |
square root | Calculates the square root |
| |
Util | Random | Generates a random number between 0 and 1 |
|
Rounding | Rounds a number to the nearest integer |
| |
Negation | Negates the value (logical not) |
| |
Condition | Conditional function: if a is true, then b, otherwise c |
|
If you want to use a formula from the cheat sheet, simply hover your mouse over an entry. On the right side, in the same row, you'll see an icon for copying the formula. Click this icon to save the formula to the clipboard. Then, close the dialog and paste the formula from the clipboard into the "Edit Formula" dialog box under "New value."
Resetting the input
If you want to reset your formula and start over, you can use the "Undo" button on the far right of the "Edit Formula" dialog. Afterward, "Current value" and "New value" will have the same values again.
Variables
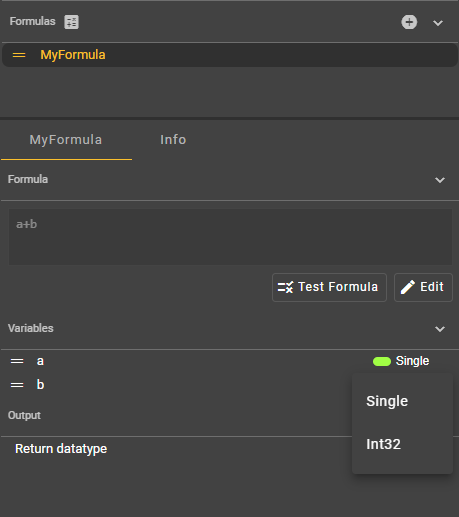
The variables are generated automatically as soon as you enter a formula. The variable names cannot be edited in this view, nor can they be deleted. To make changes, you must open the formula editing dialog. However, in the Variables section, you can customize the variable's result type: Single for floating-point numbers and Int32 for integers.
Output
The output is generated automatically as soon as you specify a formula. The output name cannot be customized, nor can the output be deleted. However, you can customize the result type at this point: Single for floating-point numbers and Int32 for integers are available.
Testing the formula
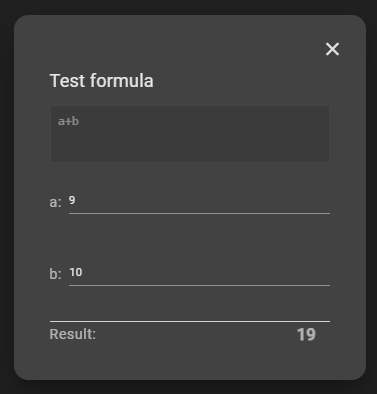
To test your formula, click the "Test Formula" button. A dialog will open. This dialog displays the formula. You can also enter values for all variables. The result of the calculation can be seen at the bottom of the dialog.
Use in workflow
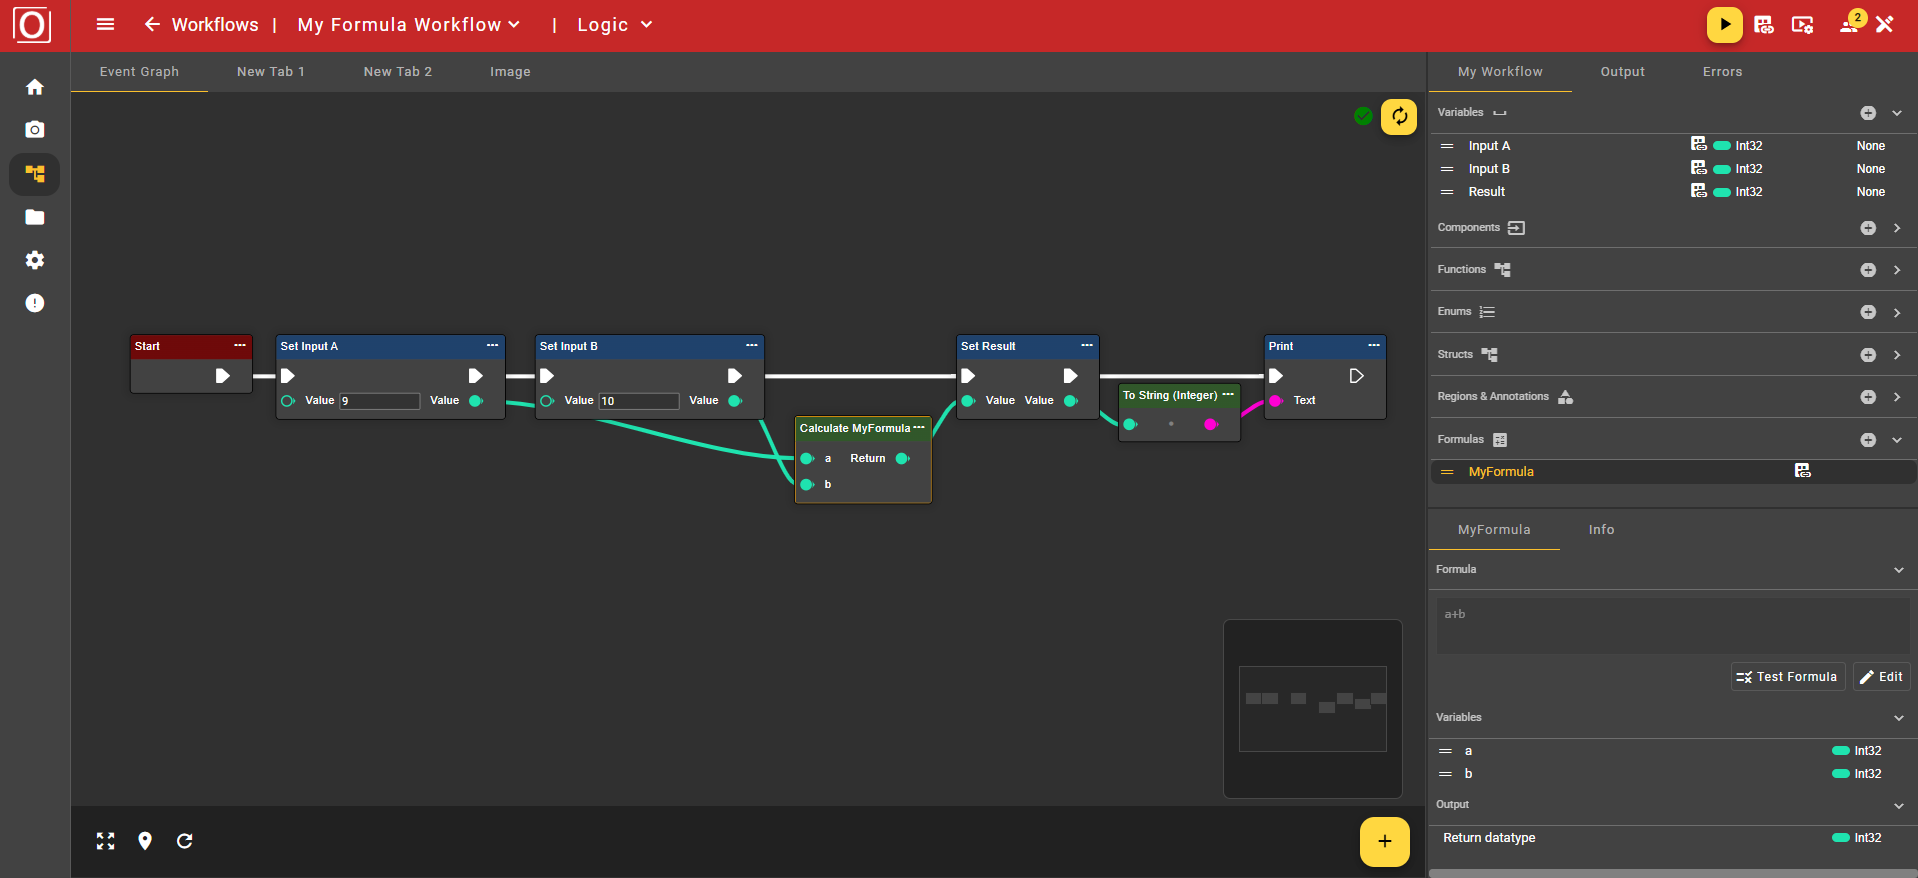
Let's assume you've created a formula named "MyFormula." To use this formula in your workflow, you need to right-click on the Event Graph tab to open the context menu. You can then type "MyFormula" into the search bar or navigate through the "Math" and "Formula" folders. Now select "Calculate MyFormula" to add the node to the workflow.