Annotations
Introduction
Annotations are shapes that you draw on an image area so that they can be used in further processing. Annotation Sets, on the other hand, group your annotations. If you have already dealt extensively with variables, then you probably already know the categories. In this case here, the Annotation Sets are equivalent to the categories.
Important: By the data type Region, we mean a binarized image and not an image section. The so-called Region Of Interest (ROI) can be configured in the form of annotations and used elsewhere.
Management of Annotations
Before you can create annotations, at least one Annotation Set must exist. This must be created in advance. To use and manage Annotation Sets and Annotations, you must ensure that you are logged in as an active editor and also verify that the workflow is not active.
Annotation Sets
Adding Annotation Sets
In the “My Workflow” section, you can create Annotation Sets. These Annotation Sets are a collection of annotations selected by you. When you click on the plus icon, you need to choose Add Annotation Set from the menu so that you can then create an Annotation Set.
Removing Annotation Sets
When you hover over an entry with the mouse, a “trash can” icon appears on the right side. Clicking on this opens a dialog where you must confirm the deletion process.
Important: Annotation Sets can only be removed if you or related annotations are not used as nodes in the workflow. If there is a usage, you must first remove the node in the workflow before you can subsequently remove the Annotation Set.
Annotations
Adding Annotations
In the "My Workflow" section, you can create annotations. These annotations are assigned to an annotation set. When you click on the plus icon, you must select Add Annotation from the menu to then create an annotation. A dialog opens where you must assign your annotation to an annotation set. Additionally, in this dialog, you must specify which shape it should be. The following "shapes" are available:
Box
Circle
Ellipse
Line
Polygon
Rectangle
If you have not fully configured your Annotation Set in advance, a warning message will appear as soon as you add an annotation. Most likely, the selection of a folder to access image files for configuration is missing.
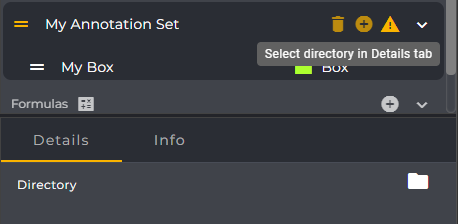
You can do this afterwards by selecting the annotation set and clicking on the folder icon next to the "Directory" attribute in the "Details" tab. Then select a folder with image files and confirm the dialog.
Removing Annotations
When you hover over an entry with the mouse, a “trash can” icon appears on the right side. Clicking on this opens a dialog where you must confirm the deletion process.
Important: Annotations can only be removed if they are not used as nodes in the workflow. If a usage exists, you must first remove the node from the workflow before you can then remove the annotation.
Sorting Annotations
In the list of annotations, you will find an icon with two horizontal bars on the left side of each entry. If you click and hold this icon, you can move entries within the annotation set area. This allows you to have a better overview.
Usages of Annotations
As soon as you add an annotation as a node in the Event Graph, a usage occurs. You can recognize this by an icon next to the annotation's label. Clicking on this icon opens a dialog listing the usage of the annotation with some details.
Use of Annotations in the Workflow
To use an annotation in the workflow, add the Get node of the respective annotation to the workflow. You can then connect it with other nodes, provided the allowed connection types match.
Common nodes that accept and process a shape are:
Crop By Shape
Draw Shape
Reduce Domain To Shape