Image Source VIU2
This chapter contains general information on operating the evoVIU camera.
Overview
You can make all possible settings for your image in the Configuration Bar. You can change these settings at any time, regardless of the activity of your stream. To have a better overview of the setting options, you can show and hide the individual sub-items at any time.
Auto Update
Below the filter area is the setting option for automatically applying changes to the image source. This setting is active by default. If you do not want to save changes in the image source automatically, you can deactivate this setting here. Instead, you will then see a button to apply the new values at the bottom right of the screen as soon as changes are made.
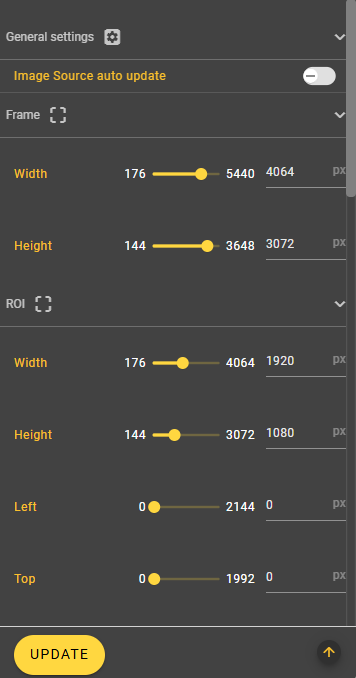
Frame
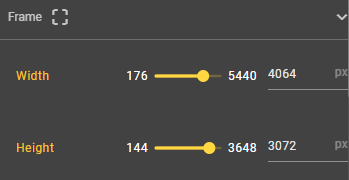
Width
Set the width of your image here.
Height
This is where you set the height of your image.
ROI
You can also define an area that looks at a particularly interesting feature of your image.
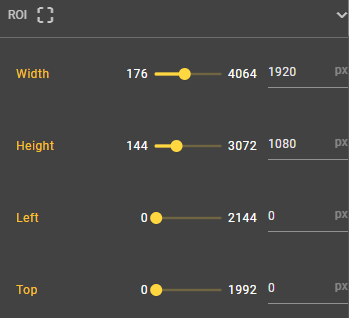
Top
This is where you set the X value for the top left-hand corner of your region of interest.
Left
Here you set the Y value for the top left-hand corner of your region of interest.
Width
Here you can set the width of your region of interest.
Height
Here you set the height of your region of interest.
Transformation
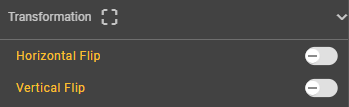
Horizontal Flip
You can use this slider to mirror the image recording along the horizontal axis.
Vertical Flip
You can use this slider to mirror the image recording along the vertical axis.
Lens Correction
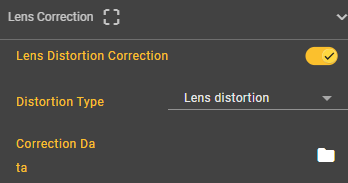
Lens Distortion Correction
You can use this slider to specify whether you want to correct the distortion effects. If you want to make a correction, the Distortion Type and Correction Data attributes are also displayed.
Distortion Type
You can specify the distortion type in this menu. The following types are available:
Lens Distortion
Fisheye Expand
Fisheye Dewarp
Correction Data
At this point, you can store a JSON file containing data on the camera matrix and the coefficients of distortion.
3A Algorithms
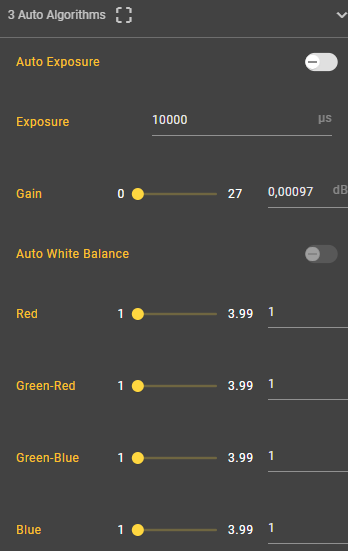
Auto Exposure
You can use this control to set whether the exposure time and gain should be set automatically or manually.
Exposure
If the value of the Auto Exposure attribute is set to On, you can select an exposure time between 1 and 3883371 microseconds. This determines how long the camera lets light onto the sensor while taking the picture. The longer the exposure time, the more light and the brighter the image will be at the end. If you see a black image in the first shot, this is often because the exposure time is set too low.
Gain
Enter a value between 0.000977 and 26.367188 to make your image brighter. All pixel values on the image are increased when the gain is increased.
Red
You can use these settings to adjust the sensitivity of the sensor to light in advance. Particularly in poor lighting conditions, you can use the per-channel gain to improve your image capture, in this case specifically for different color channels. The adjustable value is between 1 and 3.99.
Red and the associated Green-Red, Green-Blue and Blue attributes are only visible if the slider for the Auto White Balance attribute has the value Off.
Green-Red
Analogous to Red, only related to Green-Red.
Green-Blue
Analogous to Red, only related to Green-Blue.
Blue
Analogous to Red, only related to Blue.
Post Processing Color
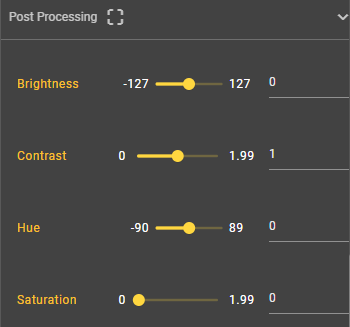
Brightness
The image brightness is an indicator of the intensity of the pixels that determine the overall brightness of the image. Values between -127 and 127 are possible here.
The following attributes are only available on cameras with color sensors, recognizable by the suffix C.
Contrast
Here you can set the difference between light and dark areas. A high contrast leads to vivid images, while a low contrast can ensure that no details are lost in light or dark areas of the image. Values between 0 and 1.99 are possible.
Hue
This attribute describes the color tone of the image, which can assume values between -90 and 89.
Saturation
The saturation can be used to specify the intensity of the color, the value of which must be between 0 and 1.99.
The following attribute is only available for cameras with a mono sensor, recognizable by the missing C at the end of the identifier.
Black Level
Black Level describes the brightness level of the darkest black. A deep, pure black is an important characteristic for image quality, as it influences the contrast ratio and the display of dark components.
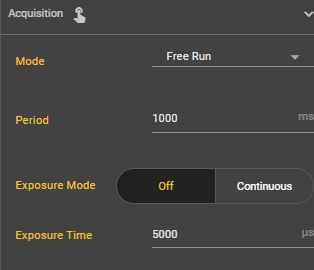
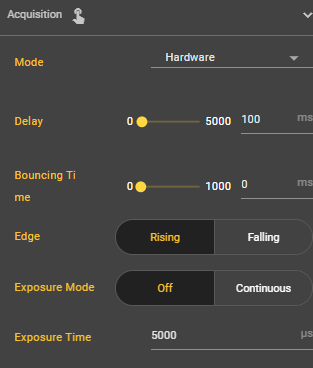
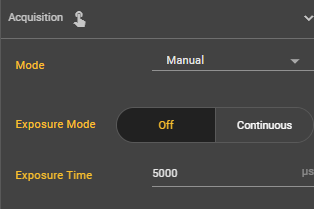
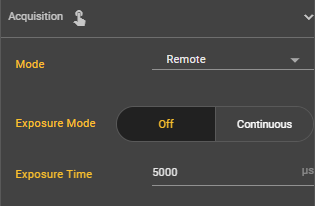
Acquisition
Mode
In the image recording settings, you can choose between four different recording modes: Manual, Free Run, Hardware and Remote. In addition, settings can be made for the exposure mode, exposure time and frame rate. Depending on the mode, there are further setting options.
Free Run
Your pictures are taken continuously in Free Run mode. Here you have the same setting options as in manual mode plus one more.
Hardware
In hardware mode, a hardware trigger triggers the recording via the trigger pin of your docker connection on the smart camera. In addition to the settings already known from manual mode, there are three more settings.
Manual
Manual mode is set by default. In this mode, you can take a picture manually using the yellow button in the Image Source Control Bar.
Remote
With the remote mode, you can also take the pictures manually, but not via the web interface, but via the http-Rest interface. The setting options are the same as for manual mode.
Attribute | Free Run | Hardware | Manual | Remote |
|---|---|---|---|---|
Bouncing Time |
|
|
|
|
Delay |
|
|
|
|
Edge |
|
|
|
|
Exposure Mode |
|
|
|
|
Exposure Time |
|
|
|
|
Period |
|
|
|
|
Attribute
Bouncing Time
You can select a value between 0 and 1000 for the bouncing time. This is the time that is waited after a trigger until a trigger is responded to again. This prevents several recordings being made in between due to incorrect triggers.
Delay
You can set a value between 0 and 5000 milliseconds for Delay. Depending on the input value, image recording is delayed after the trigger.
Edge
Here you can set whether the image should be recorded as soon as the trigger is triggered (rising) or as soon as the trigger is no longer perceived (falling).
Exposure Mode
You can select either continuous or Off for the exposure mode. If you set the exposure mode to continuous, the camera permanently adjusts the exposure to the external conditions. If you set it to Off, you can set the exposure time manually.
Exposure Time
If the exposure mode is set to Off, you can select an exposure time between 68 and 2300000 microseconds. This determines how long the camera lets light onto the sensor while taking the picture. The longer the exposure time, the more light and the brighter the image will be at the end. If you see a black image in the first shot, this is often because the exposure time is set too low.
Period
You can select how many images per second should be recorded. Select a value between 1000 and 30000 ms. A high frame rate can have a negative impact on the performance of the camera.
IO-Controller
Under this menu item, you can set your IO controller for the use of external light.
The IO controller is a hardware component that is responsible for input/output control, acts as an interface and enables data transfer between a central processing unit and the peripherals.

Use IO-Controller
Select here whether the IO controller should be used or not.
Pin 2
Light Mode
With the pin, you can choose from various lighting modes. You can work without light, with permanent lighting or triggered for a certain period of time.
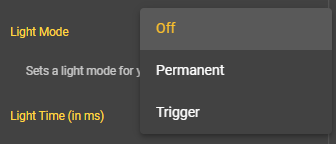
Light Time (in ms)
If you have selected the light mode trigger, you can configure the light time yourself. Enter a positive value. The value is displayed in the unit ms.
Pin 4
Light Mode
With the pin, you can choose from various lighting modes. You can work without light, with permanent lighting or triggered by a trigger for a certain period of time.
Light Time (in ms)
If you have selected the light mode trigger, you can configure the light time yourself. Enter a positive value. The value is displayed in the unit ms.
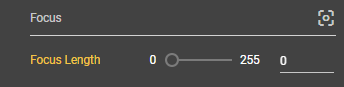
Focus
If you are using a camera with a C-mount lens, there are no attributes for configuring the image source.
Under this item, you can set the focus manually or automatically. If you want to set the focus manually, select a value between 0 and 255. This parameter is only relevant if a liquid lens is installed in your evoVIU. You can then focus on your object here.
Focus Length
Select a value between 0 and 255 here to set the focus and thus focus your image.
The Autofocus section explains in detail how you can automatically determine the best value for a sharp image.
LED Area
You can control the light of your evoVIU under the LED Area menu item. Depending on which light module you have installed, the display may look different. The boxes shown correspond to the individual LEDs.
Type | Illustration |
|---|---|
Loxi 1 | 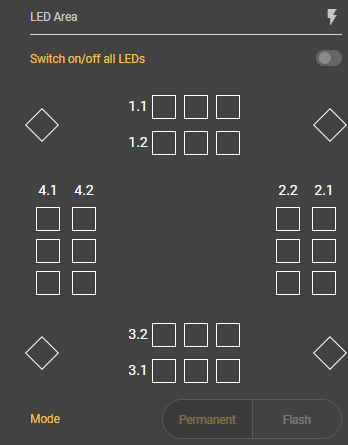 |
Loxi 2 | 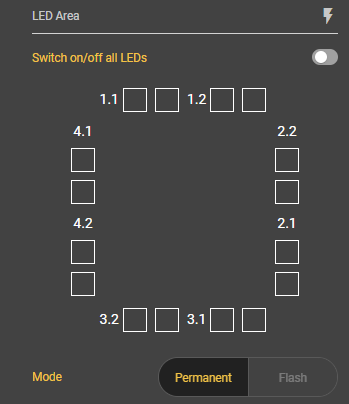 |
Loxi 3 | 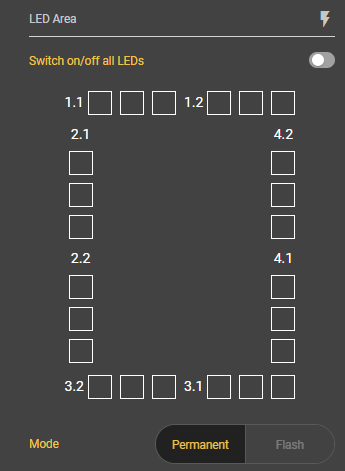 |
If you select this setting and confirm the dialog, all LEDs are switched on simultaneously. The intensity is then also the same for all LEDs.
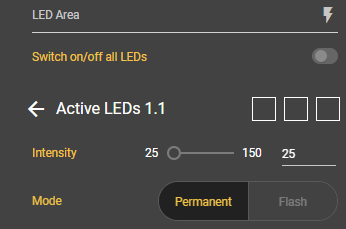
If you want to select the LEDs individually, you can simply click on one of the boxes and the respective segment will open. You can now select which LED you want to switch on in the top right-hand corner. After clicking, they will turn yellow.
Intensity
Set the intensity of the lights here. The higher the value, the brighter the LEDs light up.
Mode
Select whether the LEDs should light up permanently or flash.