NATS.IO
The evoVIU camera supports native integration with NATS.io, enabling the direct transmission of image data, metadata, or inspection results via lightweight, high-performance messaging channels. This allows the camera to be seamlessly integrated into distributed systems, cloud infrastructures, or edge computing architectures.
Communication is handled via an integrated NATS client component, which publishes messages to predefined topics. At the same time, the camera can subscribe to receive incoming messages, enabling it to process commands or configuration changes from the system. This allows for bidirectional communication between the camera and its environment.
The connection to an NATS server (e.g., nats://nats01:4222) and the desired subjects can be easily configured via the web interface. Messages can be sent in JSON or binary format; JSON offers easy readability, while the binary format is preferable for efficient transmission of large image data.
The NATS connection is designed for low latency and high reliability. Features such as automatic reconnection, heartbeat monitoring, and optional TLS-secured connections ensure stable and secure communication. If needed, messages can be tagged with reply subjects to enable direct response mechanisms (request/reply).
Thanks to this integration, the evoVIU camera can be flexibly integrated into event-driven architectures and scalable IIoT or Industry 4.0 scenarios.
When using NATS.io within evoVIU VISIONWEB, unlike other connection types, the subscription is always created in conjunction with a client. The client first establishes the connection to the desired endpoint. The subscription can then be linked to the client and its endpoint using the "Client Name" parameter.
Connection parameters
Therefore, the client must have the following information to establish a successful and secure connection:
Client certificate (e.g. .crt, .pem, etc.)
Root CA certificate (e.g. .crt, .pem, etc.)
Key file (optional) (.key)
Key file password (optional, if the key file is encrypted)
The table below shows the data you will need, which you should request from your IT department, for each specific situation.
Parameter | Authentication | ||||
|---|---|---|---|---|---|
Keine | Credentials | Certificate | Expand Certificat | Combination | |
Client Name |
|
|
|
|
|
Url |
|
|
|
|
|
Username |
|
| |||
Password |
|
| |||
CA-File |
|
|
| ||
CERT-File |
|
|
| ||
Key-File |
|
|
| ||
Use Encrypted |
|
| |||
Key-File Password |
|
| |||
Timeout |
|
|
|
|
|
Max Reconnect |
|
|
|
|
|
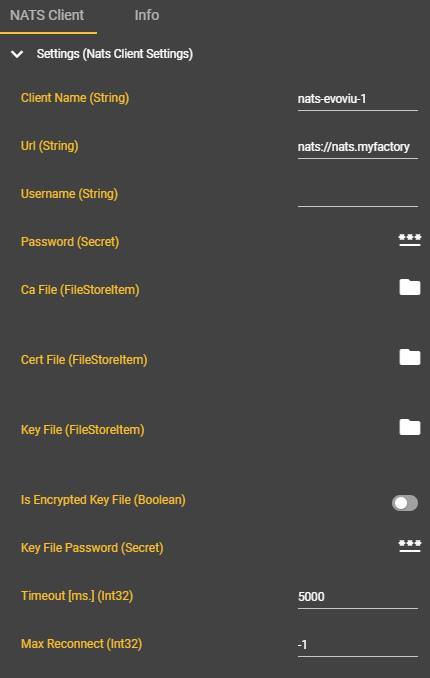
Parameter | Type | Unit | Description | Example | Subscription | Client |
|---|---|---|---|---|---|---|
Client Name | String | This refers to the configured client component through which the connection is established. A subscription cannot be created without a client. | evoviu-cam1 |
|
| |
Subject | String | This is the topic that will be subscribed to. Only messages related to this topic will be received. | HelloWorld |
| ||
URL | String | The client ID is a unique name used to identify a Kafka client with the broker. | nats://nats.myfactory |
| ||
Username | String | A username in NATS.io is used to authenticate clients with the NATS server and is often used in conjunction with a password to control access. | Hans |
| ||
Password | String | Secret | In NATS.io, a password is used in conjunction with the username to securely authenticate the client to the NATS server, thus providing better access control. This requires a secret key from the evoVIU secret store. |
| ||
Ca File | File | *.pem | The CA file in NATS.io verifies that the NATS server certificate was issued by a trusted certificate authority. |
| ||
Cert File | File | *.pem | The certificate file (cert-file) contains the public certificate of a client or broker and verifies its identity during the connection process. |
| ||
Key File | File | *.key | The key file contains the private key of the client or broker and is used to securely encrypt and sign TLS connections. |
| ||
Is Encrypted Key File | Boolean | If the key file is encrypted, the key can also be activated using another key file password. |
| |||
Key File Password | Secret | *.key | The key file password protects the private key stored in the key file from unauthorized access – it can only be decrypted with the correct password. |
| ||
Timeout | Int32 | Maximum wait time in milliseconds for server responses before a timeout occurs. | 5000 |
| ||
Max Reconnect | Int32 | This specifies how many times the system will attempt to establish a connection to the server when starting up or after a connection interruption, before giving up and terminating the connection attempt. | -1: The connection will be attempted to be re-established indefinitely (continuous reconnection attempts). 0: No reconnection attempt will be made. >0: The connection will be attempted to be re-established a maximum of x times. |
|
|
Notes on the settings
Depending on the NATS server configuration, authentication can be performed using either credentials and/or certificates. The configuration options for this are "Use Credentials Authentication" and "Use Certificate Authentication" (as toggle switches).
When authenticating using certificates, the required files (CA file, certificate file, and key file) can be loaded from the file system. These files must be stored in the file system beforehand.
If the key file is encrypted, the required password can be entered using the "Is Encrypted Key File" toggle and the "Key File Password" input field.
Workflow Setup
Difference between NATS Client and NATS Subscription
The NATS client is used to establish a connection to an NATS server and to send messages to a specific subject (publish). On the other hand, a NATS subscription allows you to receive messages as soon as new data is published to that particular subject.
The VISIONWEB platform allows you to configure any number of clients and subscriptions. For example, image capture, including associated metadata, can be triggered via a subscription and then sent to a desired destination endpoint via a connected client. Simultaneously, status data can be provided via a different client.
Creating the NATS Client - step by step
In Workflows, under Components, click the ➕.

Search for "NATS Client" and click on the entry to add the component.
A new component called "MQTT Client" has been added.
Please enter the connection parameters.
The minimum requirements are the client name (for linking with any future subscriptions) and the URL. All other fields are optional and can be used depending on the authentication method.
Select the Event Graph tab and open the context menu by right-clicking.
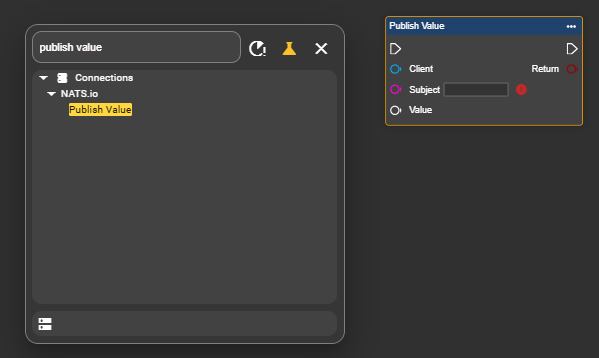
Find the "Publish Value" node under Connections and NATS.io, and add it to your workflow to send data.
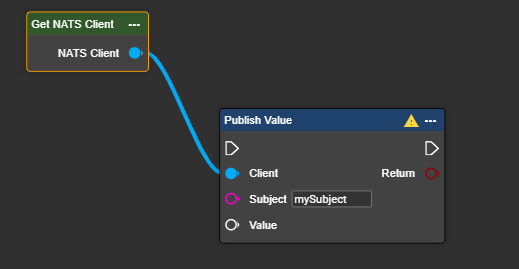
Next, select the component labeled "Get NATS Client" and connect it to the Publish component. Then, enter the desired "Subject" – which is the location where the data will be stored – as provided by the server.
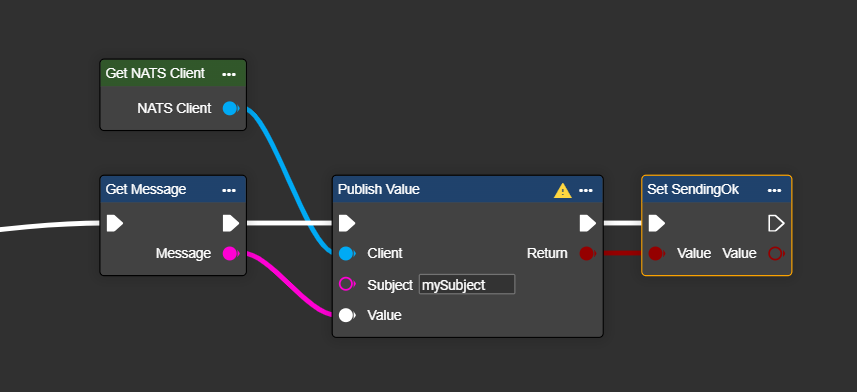
Select the variable or data structure you want to send and paste it into the Value wildcard field.

If desired, you can have the result of the transfer displayed as a Boolean value to check whether the transfer was successful.
Congratulations! You can now send your data to the desired NATS server.
Creating the NATS Subscription - step by step
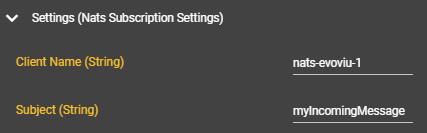
Before proceeding with this step, you must first create an NATS client, and a client name (in our example, "nats-evoviu-1") must be defined for linking within the client component. This name can be chosen freely.
In Workflows, under Components, click the ➕.
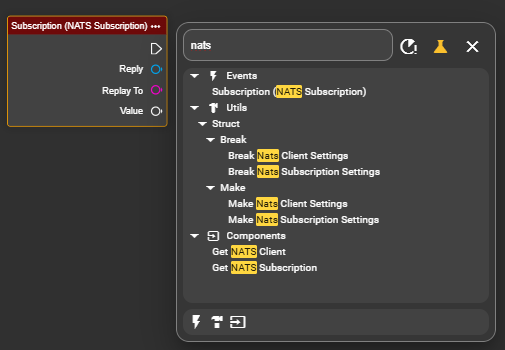
Search for "NATS Subscription" and select the entry to add the component.
A new component named "NATS Subscription" will appear. You can change this name at any time.
Please enter the connection parameters.
The minimum requirements are the client name (for linking with any future subscriptions) and the URL. All other fields are optional and can be used depending on the authentication method.
Select the Event Graph tab and open the context menu by right-clicking.
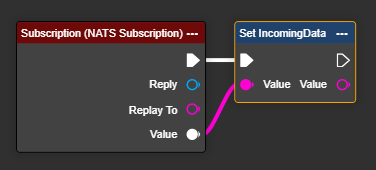
Under Events, search for the "NATS Subscription" node and add it to trigger a flow when the subject is updated.
Retrieve the data set using the wildcard value and store it directly in the desired variable.
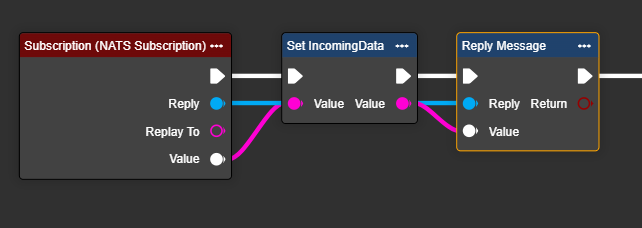
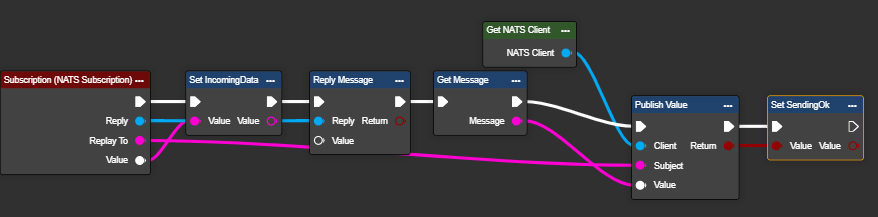
Optionally: If you need to send a confirmation of receipt directly to the NATS server, you can use the "Reply Message" node to send the desired information back. This node also allows you to bypass the "Publish Value" node. However, in this case, the reply will be sent to the original sending subject, rather than to a freely selectable subject as with the "Publish Value" node.
Optionally: If you want to reply directly to the incoming message using the "Publish Value" node, you can connect the "Reply To" output of the Subscription node directly to the "Subject" input of the "Publish Value" node.
Congratulations! You can now receive data about a subject when changes occur, and use this to trigger a flow.
Using the „Publish“ node
With the "Publish" node, you can flexibly and dynamically send data to any subject in NATS. You can either enter the desired subject directly in the node's parameter field, or have it automatically generated and included in the workflow.
Please ensure that the subject lines are correctly formatted. If you have any doubts, please contact your IT department.
Generally, the following conventions apply to subject lines:
Simple subjects (direct names) usually consist of a single term:
mySubjectHierarchical subjects consist of tokens separated by periods:
mySubject.mySub.myDataSlashes (/) are not used, as in MQTT—only periods (.) are allowed.
Do not include a trailing period at the end of the subject.
If data is not being sent or received as expected, please check that the subject line is spelled correctly. Incorrect syntax is a common cause of transmission problems.
The value can contain any data as a wildcard. This allows not only metadata and results to be transmitted, but also complete datasets, including images, if needed.
Using the „Value“ node as a Wildcard
With the "Value" node, you can dynamically insert variables or data structures into the message, which are populated during workflow execution. Simply select the desired variable and connect it to the "Value" input of the Publish node. Unlike with MQTT, no conversion to a byte array is required—data structures can be connected directly (after conversion to JSON). The wildcard sockets are marked in gray and accept any data type. This allows you to flexibly generate content at runtime and send it to the configured topic, without being limited to fixed data types.